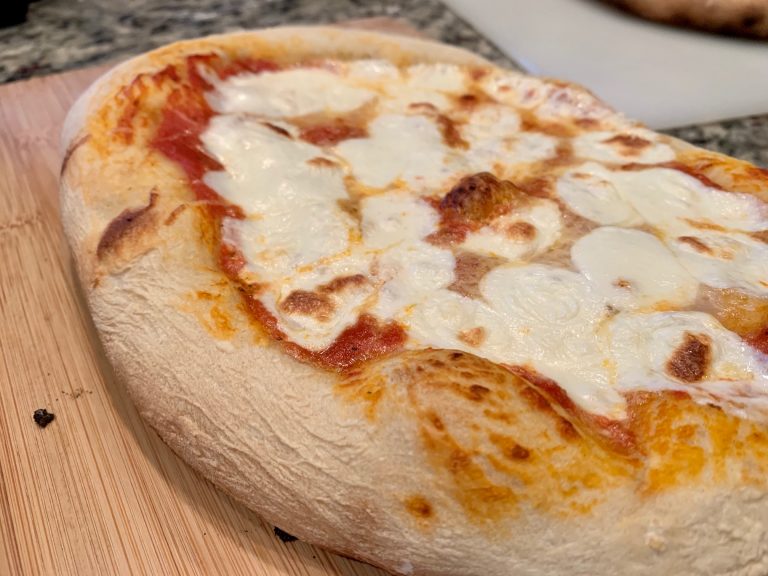
Ever since I got a proper gas grill, I’ve been working on becoming a total grillmaster. That means all the usual things like learning how to make moist and flavorful chicken, steak, fish, and vegetables…but one of my favorite things to experiment with has been grilled pizza.So I wanted to share what I’ve learned and provide my best tips for how to grill pizza dough (along with some of my favorite grilled pizza recipes).The beauty of grilled pizza is how versatile it is…you can seriously top it with just about anything, as long as it’s already cooked or mostly cooked. From veggies to protein to fruit to cheese to chocolate, you can’t go wrong.I’m sharing two different techniques for how to make grilled pizza, both of which I’ve used extensively, are easy, and work well. Part of it depends on what you prefer, and also what kind of end result you’re looking for…technique #1 has a little more of a flatbread feel and #2 is more traditional style with a puffy outer crust.
Some tools that will make grilling pizza easier
First off, you don’t *have* to have anything special to make great grilled pizza. However, over the years I’ve found that these tools make it much easier and my final product more consistent than what I had previously.
A silicone brush for brushing on olive oil and other stuff (especially technique #1)
For technique #2 you need parchment paper (I usually get mine at Costco or Sam’s)
Totally optional things that are I have loved for my own pizza adventures…
A crazy intense but amazing pizza cutter (I love this sucker, but keep your fingers free!)
This cheese mill makes grating your own cheese easier (fresh-grated is much better in my opinion, as the store-bought grated cheese have stabilizers that keep them from melting well)
Let’s talk dough…
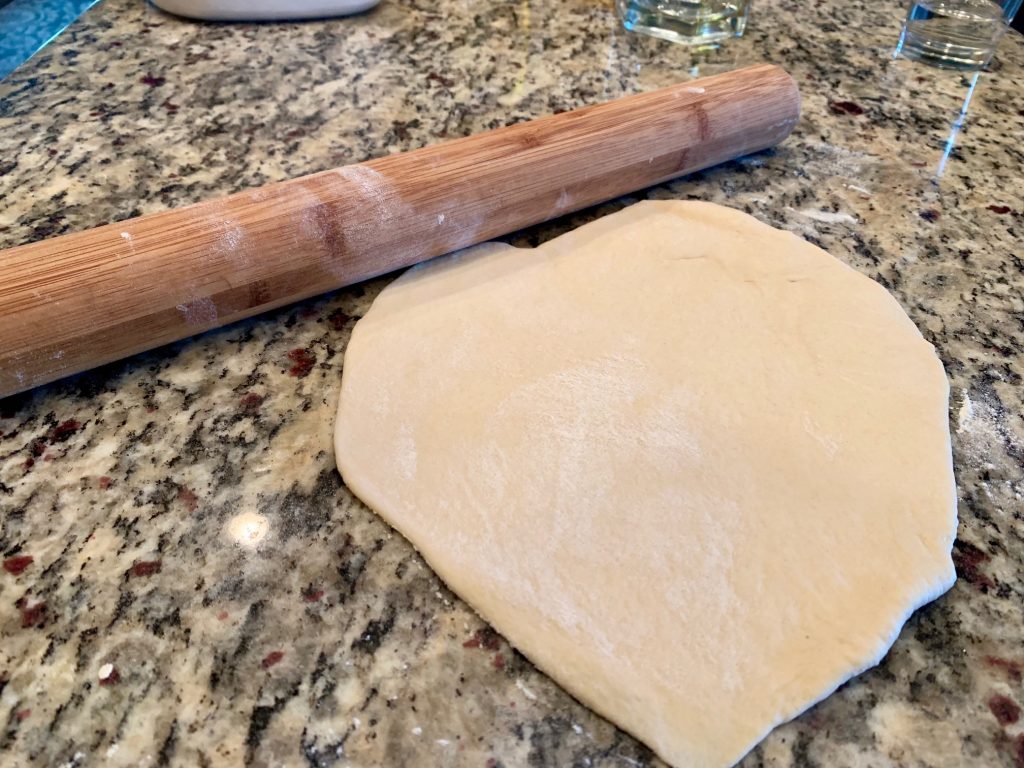
Obviously, first you need some dough. You can buy pre-made (though I haven’t tried that, so can’t speak to how well it works grilling). But making your own dough is SO easy and the flavor is so much better.I have what I think is the best grilled pizza dough recipe here with detailed instructions (one of the most popular recipes on my site for years). It’s a really easy recipe, only takes 5 minutes to throw together, and then the rising times are very flexible depending on what you need.A few tips on preparing your dough for grilling:
Make sure your dough is nice and sticky before it rises—don’t add too much flour! Dry dough will be hard to work with and won’t roll out nicely. It also has a tighter, tougher texture once grilled. A wetter dough will help make an amazing flavor and soft, chewy texture.
Feel free to make your dough the night before…it’s a super flexible recipe, and the longer it rises, the more flavor it has.
I almost always do it the night before to up the flavor potential. Just put it in the fridge overnight and bring it to room temperature before grilling (and letting it rise a bit more doesn’t hurt either).
I’ve also made the dough, rolled it into balls, and frozen it, then thawed it in the fridge overnight when needed (still need to bring it to room temp beforehand). Basically, it’s extremely forgiving.
I recommend making slightly smaller pizzas, not full size…the dough is just easier to work with, move around, etc. That’s especially important for technique #1.
You want to get the dough fairly thin so it grills evenly and your toppings melt and warm. THIS IS KEY.
If you’re using technique #2, you can leave a slightly thicker edge around the outside so it puffs up nicely.
Now it’s go time! Regardless of which technique you’re doing, preheat a gas grill with all the burners on medium-high for 10 to 15 minutes before you plan to cook (my grill gets to around 500+ F).
If you’re needing to make lots of pizzas for a crowd, just adjust your burners to more like medium right as you put the dough on the grill (still around 500 F).
If you’re only making one or two pizzas, it’s helpful to have one side of your grill on that medium to medium-high, and then one side more like low so you can control how fast your dough cooks (sometimes the bottom cooks too fast and burns).
If you’re using technique #1, I highly recommend setting up a little table or workspace near the grill with all your toppings, because things go pretty fast once you start.
How to grill pizza method #1: Right on the grill
Using a silicone brush (like this one), brush a light coating of olive oil onto one side of the dough, then carefully place the dough directly onto the grill over the flames (oil side down).Close the grill and let it cook for a few minutes, until the bottom of the dough shows char marks and is barely cooked (usually 2-3 minutes). While it’s cooking, brush some olive oil on the dough that’s facing up.Then using long silicone tongs and/or a large grill spatula, flip the dough over.Brush a little more olive oil on the cooked side, then quickly spread your sauce and toppings on it. Don’t go overboard, as this will interfere with it cooking well. I like to start with a little coating of shredded mozzarella, to get a good melt.Close the grill and cook until the bottom is nice and crispy, the toppings are warmed through, and the cheese is melted—another 2 to 5 minutes.It will vary depending on your grill. You can turn your burners down a little to avoid burning it, but I’ve found that it does need SOME direct heat to get cooked well and get everything melted.Once it’s done, use your tongs or spatula to slide the finished pizza onto a cutting board. Let it cool for a few minutes, then slice and serve. (I’m obsessed with this pizza cutter.)
How to grill pizza method #2: Parchment paper
This has become my new go-to, as it eliminates the terrifying step of flipping your dough on the grill (and wondering if it will tear). I also like that I get puffier crusts from it, a bit more traditional Italian-style result.Lay a piece of parchment paper on a cutting board or platter. Roll or stretch your dough out very thin, but you can leave the very outside a bit thicker if desired. Go ahead and top your pizza (but still be careful not to go insane with toppings or it will get very soggy and not cook properly).Then use scissors to cut around the parchment paper very close to the dough. I initially had issues with all the excess parchment ending up as black burnt bits in my pizza—this eliminates that problem.Once your grill is hot, gently slide the pizza WITH parchment paper directly onto the grates. Close the lid and let cook for 2-3 minutes.Then (once the dough starts to crust on the bottom), you can use the tongs to slide the parchment paper out and discard it.Keep cooking the pizzas directly on the grill for another few minutes. You may need to turn your heat down slightly, or even turn one of the burners off to give it some indirect heat.You’ll want to keep a very close eye on the bottom, you don’t want to burn it. Once your cheese is melted and the dough seems cooked through and crisp, use tongs, a pizza peel, or a large spatula to slide it off the grill and onto a large platter or cutting board. Let it sit for five or so minutes, then cut and serve.
Grilled pizza recipe ideas
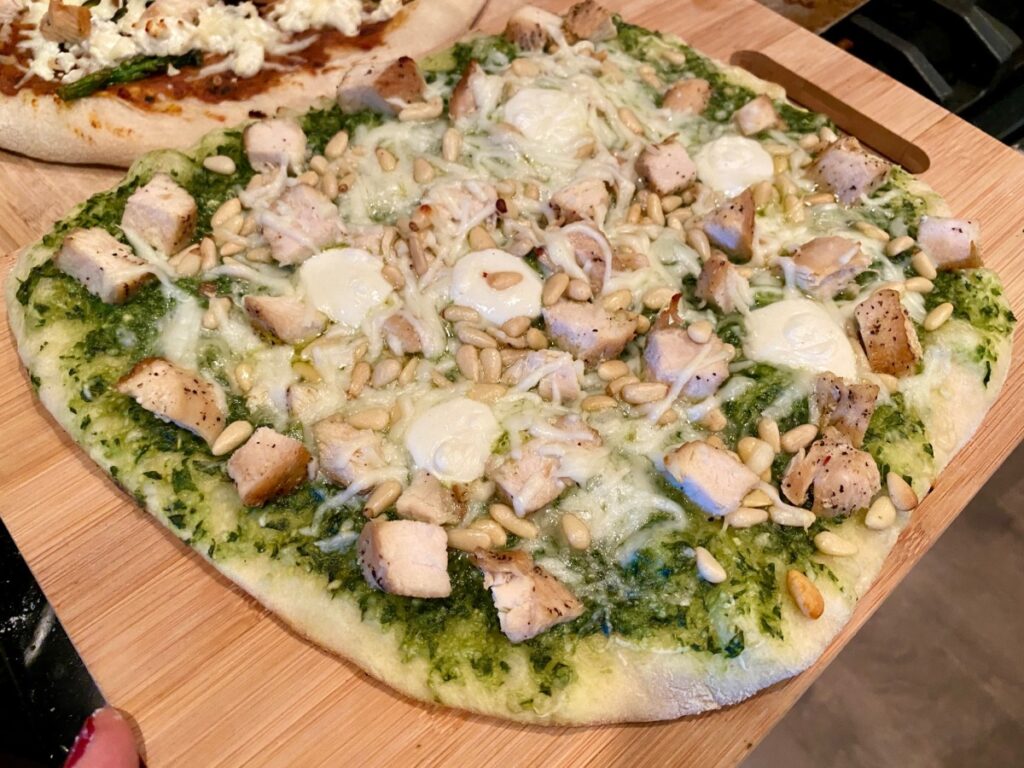
Now you can go crazy with your toppings! I’m constantly playing around with different ingredient combinations, some which work better than others. Here are some of my current favorites.Traditional Margherita PizzaAmazing Grilled BBQ Chicken PizzaFresh Basil Pesto Pizza (plain or with chicken)
Peaches, rosemary, goat cheese, and barbecue chickenGrilled zucchini, corn, and marinated fetaFresh cherries, feta, and rosemaryI’ve also tried chocolate, peanut butter, and banana, as well as peanut butter and jelly…both were delicious but not perfect (the texture was off), so still working on them. But they’re winning flavor combos! I’m still working on figuring out dessert pizzas I love.I’m still on the lookout for more awesome grilled pizza flavor and topping combinations, so hit me up with your best recommendations in the comments!Other grilled faves you’ll love:
The Best Grilled Pizza Dough (Super Easy Pizza Dough)
A delicious & easy pizza dough that stands up well for grilling. Can rise in just an hour or two, or will develop more flavor if the dough is risen overnight.
1 to 2teaspoonsof active dry or instant yeastsee notes
1/4cupof olive oil
4 1/2cupsof all-purpose floursee notes
2teaspoonsof salt
Instructions
Make the dough:
In a stand mixer (with dough hook) or large mixing bowl, stir together the water and yeast. Let it sit for a few minutes until the yeast is dissolved and starting to bubble. Then stir in 3-4 cups of the flour, the oil, and salt. Mix until a shaggy dough is formed.
If you're using a mixer, start it kneading the dough on low speed. This will give you an idea of whether you need to add more flour. You definitely want it on the stickier side. If necessary, add more flour a little at a time. Knead the dough with the dough hook for 5 to 7 minutes, or knead by hand on the counter for 6 to 8 minutes. Once it's been kneaded properly, the dough should form a smooth (still slightly sticky) ball and spring slowly back when poked.
Rising and preparing:
If you're planning to use the dough right away, place it in a lightly-oiled bowl to rise at room temperature for 1-1.5 hours, or until it's doubled. Cover with plastic wrap and let sit.
You also have the option to let it rise slowly in the fridge overnight. In that case, lightly oil a large ziploc bag and place the dough in there, and seal it. It can be refrigerated for up to 3 days. You can also freeze it (break into the appropriate portions and freeze separately); just thaw it entirely and then let it rise at room temperature for a bit.
See my separate post (linked above) for how to grill the pizzas
Notes
This recipe is super flexible. You can also halve it; I often make a half batch, which gives me 2-3 large single-person pizzas.
The less time you have to let the dough rise, use more yeast. If you're letting it rise in the fridge overnight, you can err on the lower side. I typically do 2 teaspoons because I'm using it right away.
Make sure your dough is quite sticky---don't add too much flour! Dry dough will be hard to work with and won't roll out nicely. It also has a tighter, tougher texture once grilled. A wetter dough will help make an amazing flavor and soft, chewy texture.
Feel free to make your dough the night before...it's aery flexible recipe, and the longer it rises, the more flavor it has. Just put it in the fridge overnight and bring it to room temperature (and letting it rise a bit more doesn't hurt either). Roll your dough very thin!!! This is key, because it won't be pleasant if it's too thick.
Nutrition
Serving: 1large personal pizza
Jessica
I'm Jessica! I started Finding Time for Cooking back in 2012 to force myself out of a recipe rut, and it's turned into my happy place for sharing new favorites--and a few old family secrets--with fellow food-obsessed people. When I'm not testing recipes, you'll find me hoarding jam varieties, hunting down the best pastries, or plotting my next trip.
Perfection. There’s really no other way to describe these amazing,…
23 Comments
Here’s my tip. After the toppings are on the pizza and you close the lid leave the burners on only about 2-3 minutes. Leave the lid closed and turn the burners off, let your pizza sit another 2-5 minutes. This allows the toppings to heat and the cheese to melt in the still hot, closed grill without burning your bottom.
This dough was incredible! I ended up using about 3 1/4 cups of flour and it made the right amount of sticky before the rise. I love the way the dough puffed up when I put it on the bbq and it was such a nice soft yet crispy dough that had the right amount of chew! I didnt even need to flour my counter or rolling pin when i rolled out the dough! This one is going in my recipe binder for sure! I ended up freezing the leftover dough i had also!
Hi Shaheer! I’m so glad, it’s become a complete favorite in my house. Love the chewiness and the flavor. Let me know how freezing and then thawing/re-rising the dough turns out…I’ve never tried it!
Could I freeze the dough as soon as it’s made and then let it rise in fridge as it thaws? Thinking it could be a good recipe for campfire pizza so I would need to make it beforehand.
Hey Sheila! I haven’t tried it and so a little hard to say…my gut says that you should let it do its first rise and *then* freeze it, and let it thaw/re-rise in the fridge. But I haven’t tried it…if you do, please let me know!
THAT IS CORRECT! I then make pizza dough (3 balls at time) and store in the freezer. Take out what I need the night before and put it in the refrigerator to thaw overnight.
Our favorite toppings attempt to recreate a local restaurant’s wood fired oven pizza that is no longer offered. Pesto is our sauce, cheese, chicken, artichokes, and sun dried tomatoes.
Mmmm that sounds so good. I’ve definitely been making pesto pizza! I tend to go simple and do fresh pesto with parmesan, some fresh mozzarella, and pine nuts.
One of my fav grilled pizzas is a ricotta/sour cream sauce, chicken, peppers and mozzarella. Love making grilled pizza. Will definitely be trying your dough recipe.
Can you use this dough recipe for pizzas in a wood burning outdoor pizza oven?
I have made this recipe for grilled pizzas and it is an wonderful dough, we have a Gozney “Dome” outdoor pizza oven coming next week and hoping I can still use this recipe?
Thank you!
Hi Cara! Yes, I don’t see any reason you couldn’t use it in an outdoor pizza oven. Obviously you’ll need to play around with the baking times a bit and determine if the dough thickness should be adjusted, but this shouldn’t act any different than other pizza doughs.
Do you have a favorite flour? And have you ever used bread flour? We have tried grilled pizza and it didn’t go well… so anxious to try your recipe and all the instruction you provided. Your article is excellent!
Thank you , I’m saving your post in my favorites
Hi Laura! Honestly I can’t remember if I’ve used bread flour for this…I’ve probably used a 50/50 combo of it with all-purpose at some point, I’ve made this dough so often. It should work well though may need a tiny bit more water. If you’ve had trouble with grilling pizza in the past, I’d definitely recommend my parchment paper technique to start as it doesn’t have the nerve-wracking “straight on the grill and flip the dough” approach. It’s what I usually use more often than not as it results in a slightly more traditional-looking pizza. Good luck!
 plus the tools I use and several awesome pizza recipe ideas. This is such a great summertime dinner recipe, and easier than you'd think! How to make grilled pizza. #pizza #grill #pizzadough #grilledpizza") The beauty of grilled pizza is how versatile it is…you can seriously top it with just about anything, as long as it’s already cooked or mostly cooked. From veggies to protein to fruit to cheese to chocolate, you can’t go wrong.I’m sharing two different techniques for how to make grilled pizza, both of which I’ve used extensively, are easy, and work well. Part of it depends on what you prefer, and also what kind of end result you’re looking for…technique #1 has a little more of a flatbread feel and #2 is more traditional style with a puffy outer crust.
The beauty of grilled pizza is how versatile it is…you can seriously top it with just about anything, as long as it’s already cooked or mostly cooked. From veggies to protein to fruit to cheese to chocolate, you can’t go wrong.I’m sharing two different techniques for how to make grilled pizza, both of which I’ve used extensively, are easy, and work well. Part of it depends on what you prefer, and also what kind of end result you’re looking for…technique #1 has a little more of a flatbread feel and #2 is more traditional style with a puffy outer crust. plus the tools I use and several awesome pizza recipe ideas. This is such a great summertime dinner recipe, and easier than you'd think! How to make grilled pizza. #pizza #grill #pizzadough #grilledpizza")
 Close the grill and let it cook for a few minutes, until the bottom of the dough shows char marks and is barely cooked (usually 2-3 minutes). While it’s cooking, brush some olive oil on the dough that’s facing up.Then using long silicone tongs and/or a large grill spatula, flip the dough over.
 Brush a little more olive oil on the cooked side, then quickly spread your sauce and toppings on it. Don’t go overboard, as this will interfere with it cooking well. I like to start with a little coating of shredded mozzarella, to get a good melt.
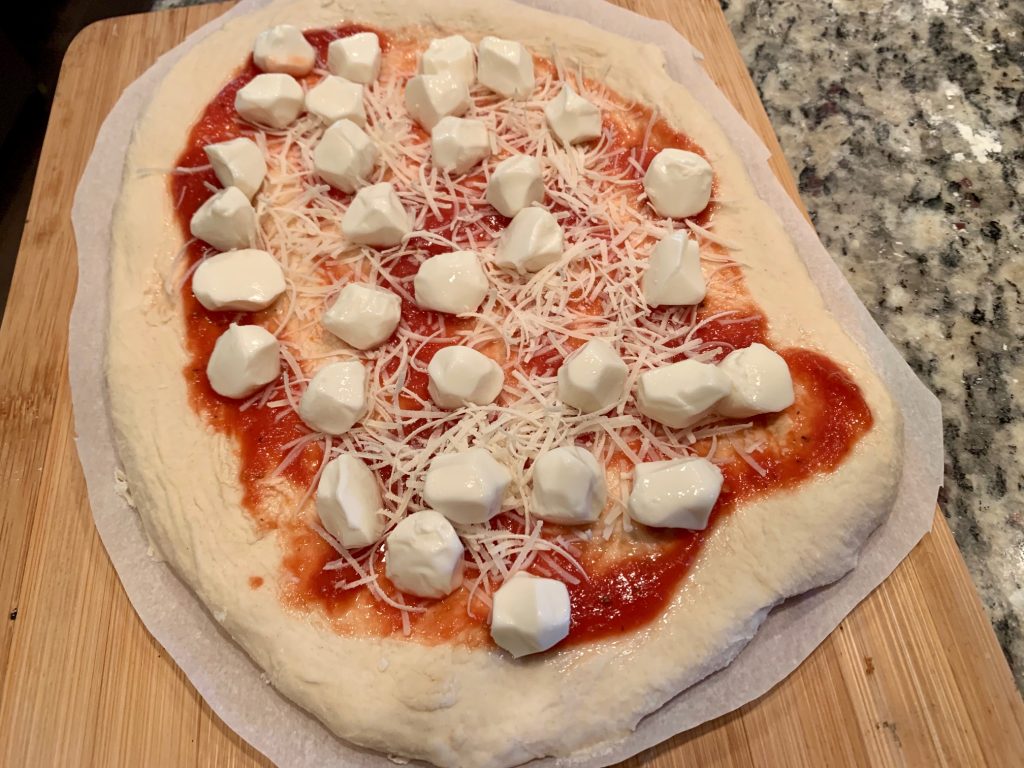 Once your grill is hot, gently slide the pizza WITH parchment paper directly onto the grates. Close the lid and let cook for 2-3 minutes.Then (once the dough starts to crust on the bottom), you can use the tongs to slide the parchment paper out and discard it.Keep cooking the pizzas directly on the grill for another few minutes. You may need to turn your heat down slightly, or even turn one of the burners off to give it some indirect heat.You’ll want to keep a very close eye on the bottom, you don’t want to burn it. Once your cheese is melted and the dough seems cooked through and crisp, use tongs, a pizza peel, or a large spatula to slide it off the grill and onto a large platter or cutting board. Let it sit for five or so minutes, then cut and serve.
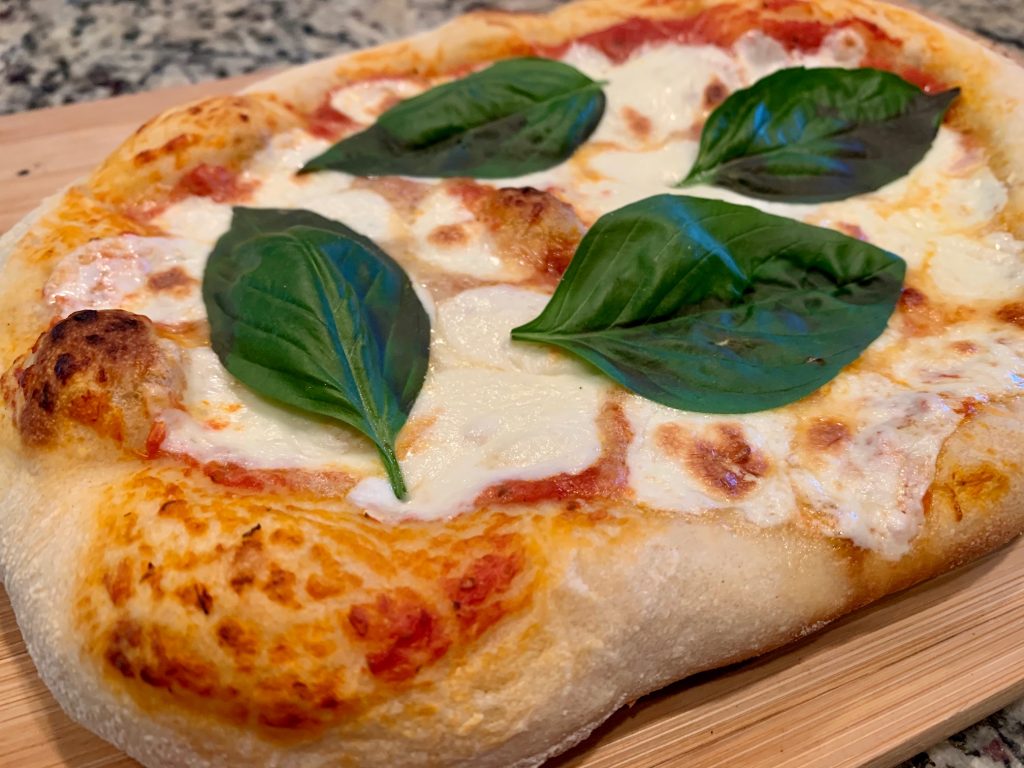
 plus the tools I use and several awesome pizza recipe ideas. This is such a great summertime dinner recipe, and easier than you'd think! How to make grilled pizza. #pizza #grill #pizzadough #grilledpizza") Fresh Basil Pesto Pizza (plain or with chicken)
Fresh Basil Pesto Pizza (plain or with chicken)
 Grilled zucchini, corn, and marinated feta
  Fresh cherries, feta, and rosemary
 plus the tools I use and several awesome pizza recipe ideas. This is such a great summertime dinner recipe, and easier than you'd think! How to make grilled pizza. #pizza #grill #pizzadough #grilledpizza") I’ve also tried chocolate, peanut butter, and banana, as well as peanut butter and jelly…both were delicious but not perfect (the texture was off), so still working on them. But they’re winning flavor combos! I’m still working on figuring out dessert pizzas I love.I’m still on the lookout for more awesome grilled pizza flavor and topping combinations, so hit me up with your best recommendations in the comments!Other grilled faves you’ll love:
I’ve also tried chocolate, peanut butter, and banana, as well as peanut butter and jelly…both were delicious but not perfect (the texture was off), so still working on them. But they’re winning flavor combos! I’m still working on figuring out dessert pizzas I love.I’m still on the lookout for more awesome grilled pizza flavor and topping combinations, so hit me up with your best recommendations in the comments!Other grilled faves you’ll love: plus the tools I use and several awesome pizza recipe ideas. This is such a great summertime dinner recipe, and easier than you'd think! How to make grilled pizza. #pizza #grill #pizzadough #grilledpizza")
 Print Recipe
Here’s my tip. After the toppings are on the pizza and you close the lid leave the burners on only about 2-3 minutes. Leave the lid closed and turn the burners off, let your pizza sit another 2-5 minutes. This allows the toppings to heat and the cheese to melt in the still hot, closed grill without burning your bottom.
That’s a good idea! Especially to get that cheese nice and melty…
This dough was incredible! I ended up using about 3 1/4 cups of flour and it made the right amount of sticky before the rise. I love the way the dough puffed up when I put it on the bbq and it was such a nice soft yet crispy dough that had the right amount of chew! I didnt even need to flour my counter or rolling pin when i rolled out the dough! This one is going in my recipe binder for sure! I ended up freezing the leftover dough i had also!
Hi Shaheer! I’m so glad, it’s become a complete favorite in my house. Love the chewiness and the flavor. Let me know how freezing and then thawing/re-rising the dough turns out…I’ve never tried it!
Have you ever made the dough gluten free?
Hi Cassie! I have not made it gluten-free, but if you give it a try with some gluten-free flour mix I’d love to know how it turns out!
Could I freeze the dough as soon as it’s made and then let it rise in fridge as it thaws? Thinking it could be a good recipe for campfire pizza so I would need to make it beforehand.
Hey Sheila! I haven’t tried it and so a little hard to say…my gut says that you should let it do its first rise and *then* freeze it, and let it thaw/re-rise in the fridge. But I haven’t tried it…if you do, please let me know!
THAT IS CORRECT! I then make pizza dough (3 balls at time) and store in the freezer. Take out what I need the night before and put it in the refrigerator to thaw overnight.
Trying this with our favorite toppings: thin sliced red skinned potatoes (pre boiled), crumbled bacon with ranch dressing . Potato skin pizza!
Mmmmm sounds good! Love potatoes on pizza!
Our favorite toppings attempt to recreate a local restaurant’s wood fired oven pizza that is no longer offered. Pesto is our sauce, cheese, chicken, artichokes, and sun dried tomatoes.
Mmmm that sounds so good. I’ve definitely been making pesto pizza! I tend to go simple and do fresh pesto with parmesan, some fresh mozzarella, and pine nuts.
We don’t currently have our grill, so we made this under the broiler and it came out great! Not the same as grilled, but still really good.
It’s so versatile! I’ve made it in the oven a few times, with a pizza stone.
One of my fav grilled pizzas is a ricotta/sour cream sauce, chicken, peppers and mozzarella. Love making grilled pizza. Will definitely be trying your dough recipe.
Oooh that sounds like a delicious combo!
Can you use this dough recipe for pizzas in a wood burning outdoor pizza oven?
I have made this recipe for grilled pizzas and it is an wonderful dough, we have a Gozney “Dome” outdoor pizza oven coming next week and hoping I can still use this recipe?
Thank you!
Hi Cara! Yes, I don’t see any reason you couldn’t use it in an outdoor pizza oven. Obviously you’ll need to play around with the baking times a bit and determine if the dough thickness should be adjusted, but this shouldn’t act any different than other pizza doughs.
Put a little homemade white garlic sauce, grilled chicken, sun dried tomatoes, mushrooms and basil on it. So good!
Do you have a favorite flour? And have you ever used bread flour? We have tried grilled pizza and it didn’t go well… so anxious to try your recipe and all the instruction you provided. Your article is excellent!
Thank you , I’m saving your post in my favorites
Hi Laura! Honestly I can’t remember if I’ve used bread flour for this…I’ve probably used a 50/50 combo of it with all-purpose at some point, I’ve made this dough so often. It should work well though may need a tiny bit more water. If you’ve had trouble with grilling pizza in the past, I’d definitely recommend my parchment paper technique to start as it doesn’t have the nerve-wracking “straight on the grill and flip the dough” approach. It’s what I usually use more often than not as it results in a slightly more traditional-looking pizza. Good luck!