The Best Basic Soft Dinner Rolls
You know those holiday gatherings where you have amazing homemade turkey and side dishes and pies and just…so much food?? And then bread was a complete afterthought so someone grabbed a couple packages of rolls from the store?
These are not those rolls. These soft dinner rolls are easy and delicious, and need to become your go-to for any kind of dinner party or holiday gathering.

See my guide for figuring out what bread to make (based on needs & time you have)
A really good soft dinner roll is a thing of beauty. Pillowy and a little chewy, they have that awesome texture when you rip them. They don’t try to take over on flavor, but are the best vehicle for piling on butter and honey. And who knew they were so easy to make?!

Take this to the next level: Salted Honey Parker House Rolls (the best ever!)
While these homemade yeast rolls are pretty basic, they can easily be flavored a bit if desired…some garlic, herbs, or honey are all good options. Go nuts!

These rolls make my list of best Thanksgiving recipes for sure!
To prepare the dough, put the warm milk, yeast, and 1 tablespoon of the sugar together in the bowl of your stand mixer, fitted with a dough hook or paddle attachment Lightly stir together, then cover and allow to sit for 5 minutes.
Once the yeast has bloomed, add the remaining sugar, the egg, butter, salt, and 1 cup of flour. Beat on low speed for 30 seconds, scrape down the sides of the bowl with a rubber spatula.
Add the remaining flour gradually, as you may not need all of it (I didn’t). You want a stickier dough. Beat or knead on medium speed until the dough comes together and pulls away from the sides of the bowl (about 2 minutes).
Keep the dough in the mixer and knead for an additional 2 minutes (or you can turn it onto a lightly-floured surface and knead by hand for a couple minutes).

Lightly grease a large bowl with oil and place the ball of dough in the bowl, briefly turning it to coat all sides in the oil. Cover with plastic wrap and allow to rise in a relatively warm environment for 1-2 hours, or until double in size.


Grease a 9×13 inch baking pan (glass preferable to metal) or two 9-inch baking pans (you can use alternative pans if you want).
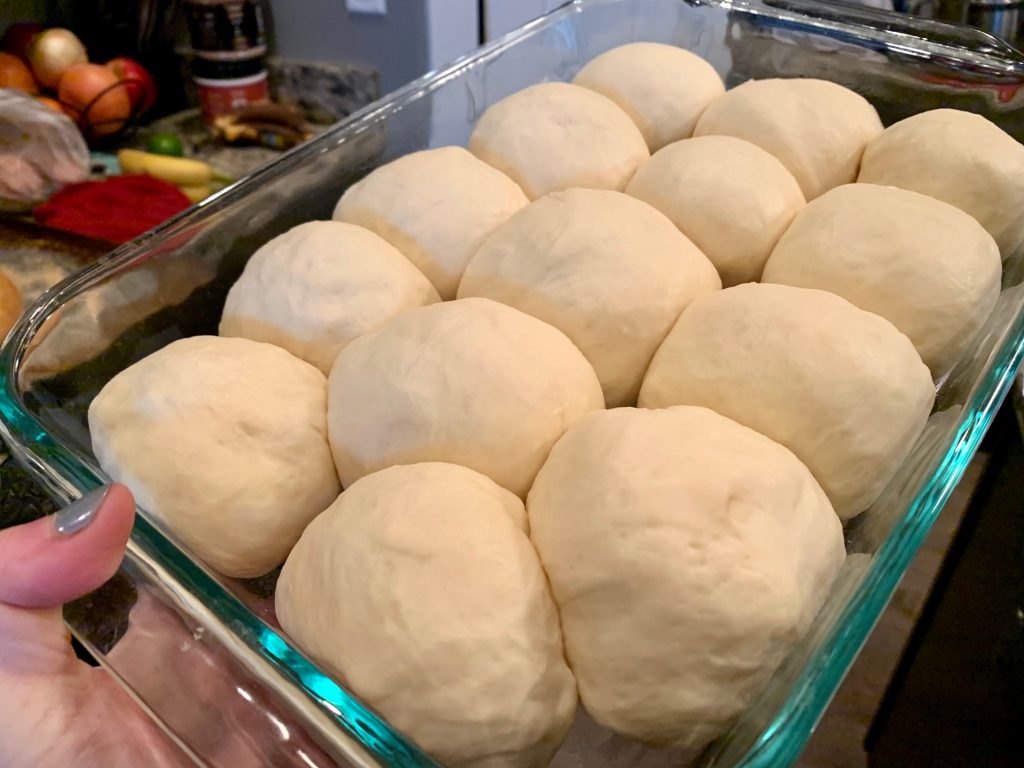
When the dough is ready, punch it down to release the air (“knocking it back”) and divide into 14-16 equal pieces. I like to use a scraper tool for this, see link below. Perfect isn’t necessarily here.

Shape each piece into a smooth ball. I kind of roll it into a rough ball, place it in the palm of my hand and pull pieces out to tuck under the ball (to make it smooth on top), then gently roll the knit/seams on the counter. See photos above.


Arrange in your prepared baking pans, leaving a little room between them since they’ll grow on their second rise. Cover the pans with plastic wrap and allow to rise again until puffy, 45 minutes to 1 hour.


Adjust oven rack to a lower position and preheat oven to 350°F. Bake for 20-25 minutes, or until the tops are golden brown. Rotate the pan halfway through. If the tops are browning too fast, you can cover loosely with aluminum foil.
Remove from the oven and brush with melted butter (or honey butter), then allow to cool slightly before serving. The melted butter not only gives you that little glisten on top, but also helps make sure that they stay *soft* dinner rolls and don’t get stale quickly.

You might also like: The Kitchen Tools & Gear I Swear By
Look at those babies gleam!! These homemade yeast rolls definitely deserve a permanent spot in your holiday recipe repertoire.
Other basic go-to bread recipes you’ll love:
- Outlander Kitchen’s Easy Drop Biscuits
- The Easiest, Best Focaccia Bread Ever
- Whole Wheat Rosemary Olive Oil Bread with Sea Salt
- Crusty French Baguettes in 30 Minutes
- Delicious Homemade Bread in the Air Fryer
- 1-Hour Skillet Focaccia
- A Traditional Challah Bread (& 4-Strand Braided Round)
- An Easy Tool to Decide What Bread to Make Based On How Long You Have…
Adapted from Sally’s Baking Addiction
Pin for later!


The Best Basic Soft Dinner Rolls
Equipment
Ingredients
- 1 cup 240ml of whole milk, warmed to about 110°F
- 2 1/4 teaspoons 1 packet of instant yeast
- 2 tablespoons of granulated sugar divided
- 1 large egg
- 1/4 cup 60g of unsalted butter, softened to room temperature and cut into 4 pieces
- 1 teaspoon of salt
- 3 cups 375g of all-purpose flour or bread flour; I didn't use all of this
- Optional topping: 2 tablespoons of melted unsalted butter can mix with honey if you want sweeter, sea salt flakes
Instructions
- To prepare the dough, put the warm milk, yeast, and 1 tablespoon of the sugar together in the bowl of your stand mixer, fitted with a dough hook or paddle attachment Lightly stir together, then cover and allow to sit for 5 minutes.
- Once the yeast has bloomed, add the remaining sugar, the egg, butter, salt, and 1 cup of flour. Beat on low speed for 30 seconds, scrape down the sides of the bowl with a rubber spatula.
- Add the remaining flour gradually, as you may not need all of it (I didn't). You want a stickier dough. Beat or knead on medium speed until the dough comes together and pulls away from the sides of the bowl (about 2 minutes).
- Keep the dough in the mixer and knead for an additional 2 minutes (or you can turn it onto a lightly-floured surface and knead by hand for a couple minutes).
- Lightly grease a large bowl with oil and place the ball of dough in the bowl, briefly turning it to coat all sides in the oil. Cover with plastic wrap and allow to rise in a relatively warm environment for 1-2 hours, or until double in size.
- Grease a 9×13 inch baking pan (glass preferable to metal) or two 9-inch baking pans (you can use alternative pans if you want).
- When the dough is ready, punch it down to release the air ("knocking it back") and divide into 14-16 equal pieces. I like to use a scraper tool for this, see link below. Perfect isn't necessarily here.
- Shape each piece into a smooth ball. I kind of roll it into a rough ball, place it in the palm of my hand and pull pieces out to tuck under the ball (to make it smooth on top), then gently roll the knit/seams on the counter. See photos above.
- Arrange in your prepared baking pans, leaving a little room between them since they'll grow on their second rise. Cover the pans with plastic wrap and allow to rise again until puffy, 45 minutes to 1 hour.
- Adjust oven rack to a lower position and preheat oven to 350°F. Bake for 20-25 minutes, or until the tops are golden brown. Rotate the pan halfway through. If the tops are browning too fast, you can cover loosely with aluminum foil.
- Remove from the oven and brush with melted butter (or honey butter), then allow to cool slightly before serving.
Notes
- A glass pan is definitely preferable to metal, which will brown faster and more unevenly (possibly leaving a doughy center)
- You can add flavors to these easily, like chopped fresh herbs, garlic powder (or a garlic butter brushed on), dried fruit to make it sweet, etc. If you're wanting to make these vegan, a reader gave detailed notes in the comments about how she did it, and said it turned out amazing...included bread flour, vegan butter, and plant-based buttermilk, with some vegan butter, garlic, and parsley on top. Check out her comment if you're interested!


My rolls came out too crispy at the bottom and really didn’t rise much. I’m not sure why I did wrong. I didn’t use whole milk; I used almond milk so I’m not sure if that’s the culprit.
Hi Brittany! That’s sad to hear, and I’m also not certain if the almond milk is the culprit, but I would imagine it is definitely a part of the problem…milk plays an actual chemistry role in bread baking, not only lending flavor but leading to a softer dough (increases water absorption) and impacts the rising time and yeast fermentation, reaction of the gluten, and more. So swapping in a pretend milk like almond in this case without true whey proteins would definitely impact moisture and rise among other things. Using 2% instead of whole wouldn’t make a big difference, but if you are trying to avoid regular milk I’d look for a roll recipe that doesn’t include milk at all and see if that helps!
Fantastic recipe! I had some seasoned butter -Asiago and chive- on hand and used that for the butter and as a spread. They were bonkers good! And so simple. Thank you
Oooh that sounds so good!
I made these using bread flour, Myoko Vegan butter , and plant based buttermilk and they were fantastic!!
I brushed them with melted “butter”, garlic, and parsley and “the crowd went wild.” Vegan and non-vegan family said they were the best they ever had.
Thank you for your recipe:)
Thank you for the note! That’s great to know, and I’ll add a bit to the recipe notes letting people know this as well.
So this was my first time making bread. My dough never rose. What could I have done wrong? I used active dry yeast, but I did have to add about a cup more flour to get the dough to the consistency to manipulate it. Thanks for any suggestions.
Sorry the recipe didn’t work out! Bread can certainly be temperamental sometimes. That’s strange that your dough didn’t rise, though it’s definitely happened to me on a variety of bread recipes. Sometimes it’s that active dry yeast often requires a longer time to activate the yeast in the warm liquid before you make the dough, or that the liquid was too hot (which kills the yeast). Sometimes the yeast is dead or old and needs thrown out. When you did step 1 with the liquid and yeast, did you end up with a good foam on top before adding in the flour? It could be that adding so much extra flour made it harder for the dough to rise as well. Did you weigh the flour, or use volume measurements? I will say that instant yeast is sometimes more forgiving, particularly for newer bakers, so you may consider that and see if you have better luck!
First try at making these rolls! I didn’t have whole milk and I was afraid to use 1/2 % milk so I stole a little Half/ half from my husbands creamer stash ! Also, I only had 2 cups of flour! Made them anyway ! Turned out delicious ! I will use more flour next time ! These were very airy but great! I mixed butter and honey and drizzled it over the rolls after bringing them out of the oven! I will definitely make these again!
Hi Marilyn! I’m glad they worked out, I’ve found this recipe to be quite forgiving. I wouldn’t worry too much about using a lower-fat milk in a pinch, though I would have done what you did and added some cream if I had it 🙂 Cheers!
Can these rolls be made by hand as I don’t own a standing mixer with a dough hook or paddle. I have a lot of spatulas and wooden spoons.
Hi Sharon! Yes, they can be made by hand, you’ll just need to make sure you mix well and then really knead the dough well by hand…I’d guess 5-10 minutes by hand, you want it nice and smooth and decently stretchy. I hope they turn out well for you!
These sound amazing!!! I plan to give them a try this week. I was wondering if it would be possible to make them and freeze at some point before baking or if you’d advise against that.
Thanks for sharing!!
Hi Amy! I can’t say for sure, as I haven’t tried it, but I think it’s theoretically possible. What I’ve done with my pizza dough before is rolled it into dough balls (about the size of these rolls), put each on a small square of parchment paper, and in a ziploc placed on a baking sheet in the freezer. That helps them keep their shape until frozen. Once they’re frozen they can be tossed in the ziploc any which way. Then I put them in the fridge overnight to thaw, and pulled them out of the fridge with plenty of time to not only come to room temperature, but THEN rise 30-45 minutes at least before baking. Worth a try…I doubt they’ll be *quite* as good as just making fresh, but it should work. If you try it, let me know how they turn out!
My first try at this recipe. I followed every step and they came out flat and crispy on the bottom. I am so bummed. This is my 5th go at trying to make yeast rolls and no recipe ever turns out like the pictures. Sadly disappointed.
Hi Michelle, thanks for your note! That’s such a bummer that your rolls didn’t turn out well. As you’ve said your previous recipe attempts also haven’t worked and specifically that they were flat, I’m curious whether maybe there’s something wrong with your yeast (it’s quite common for yeast to need replaced), or whether you’re using the correct type? I hope you have success in the future!
Can I use salted butter as that is all I have on hand?
Hi Dawn! Yes, you can use salted butter instead, and then just back off the salt that the recipe calls for (my instinct is to do 1/2 teaspoon or a bit more, instead of 1 teaspoon).
Have you ever made some and froze them to bake in the future?
Hi Marissa! I haven’t tried that, but it should work. I’m not positive on baking *from* frozen, but rather I’d definitely let them thaw overnight, and then come to room temperature on the counter and then about 30-60 minutes to re-rise before baking. If you try it, please let me know how it turns out!
These dinner rolls look absolutely delicious! I love how easy the recipe sounds. I can’t wait to try making them for our family dinner this weekend. Thanks for sharing!
I hope you see this quickly because the dough is on the first rise. Can I shape into rolls and refrigerate and bake the next day? Can I let them sit out for 1.5 hours and then bake?
Hi Candie! So sorry, I didn’t see this until now for some reason, usually I get a notification. How did it turn out? I haven’t tried it this way but that should work. Conversely you should *theoretically* also be able to do an overnight rise in the fridge as your first rise and then shape and let it do a normal second rise, but also haven’t tried it that way.