The Most Epic Single-Serving Molten Chocolate Lava Cake
What if I told you that you could have the most amazing delicious bittersweet single-serving chocolate lava cake…in 15 minutes??
And if I told you that it’s also naturally gluten-free and *mostly* dairy-free?? (It does have some butter and whatever’s in the chocolate, so your mileage may vary if you’re crazy sensitive…)
So, yeah, this is one of the most dangerous recipes I’ve ever made.
, naturally gluten-free, & delicious. Make this easy single-serve dessert any day of the week. Single-serving lava cake recipe! #singleserve #lavacake #chocolate #easydessert #gf #glutenfree")
This is a true unicorn recipe, requiring only a few ingredients, a very short amount of time, and yielding an indulgent treat that’s the perfect texture and JUST the right amount of sweet/rich (for me, I keep mine more on the bittersweet side, but the recipe gives you options).
, naturally gluten-free, & delicious. Make this easy single-serve dessert any day of the week. Single-serving lava cake recipe! #singleserve #lavacake #chocolate #easydessert #gf #glutenfree")
The texture of these single-serving chocolate lava cakes is more like a sturdier chocolate chocolate soufflé or my flourless chocolate cake rather than an actual CAKE. It’s delicate and melts in your mouth.
And while they’re perfect on their own, I also love playing around with different fillings. I think my favorite is still a dollop of peanut butter, but I’ve also tested some unique ones like my peanut butter balsamic caramel sauce and tart Morello cherry jam (with lemon zest in the batter).

To make these, start by heating your oven to 450 F. Brush a 6-ounce ramekin or baking cup with melted butter, making sure not to miss any spots. I’ve found through trial and error that using a silicone basting brush to paint the melted butter up the sides works perfectly.
Spoon a little cocoa powder in and pat it around so it coats the bottom and sides, then knock the excess out.

In a medium heatproof bowl, put the butter and chocolate pieces and melt them about two-thirds of the way. You don’t want it all the way melted because it will be too hot to add the egg.
There are two ways you can do this, either in the microwave or set over a pot of simmering water—I do the microwave, about 15-20 seconds at a time and stirring in-between.
One thing I feel VERY strongly about is the importance of good quality chocolate here! Something like Guittard or Ghiradelli works fine, and you want something at least 60% dark (I’ve found the sweet spot is 60-73% cocoa, and around 71% is my preference).
I also strongly recommend using a kitchen scale to weigh everything, as the amounts and proportions are pretty critical to the final texture of the lava cake.


Whisk until it finishes melting and then whisk in the sugar and salt.

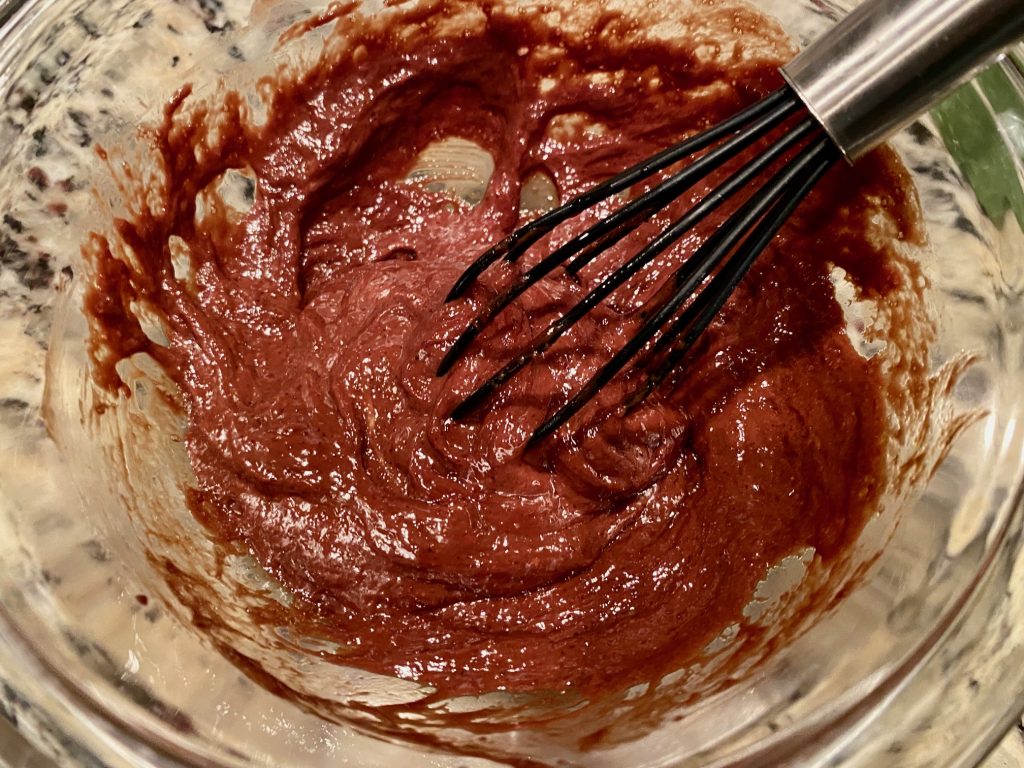
Whisk in the (most of an) egg and beat it until mixed in, and THEN add a good 20 to 30 extra stirs/beats. This ensures that the mixture is smooth, glossy, and lightened a bit.
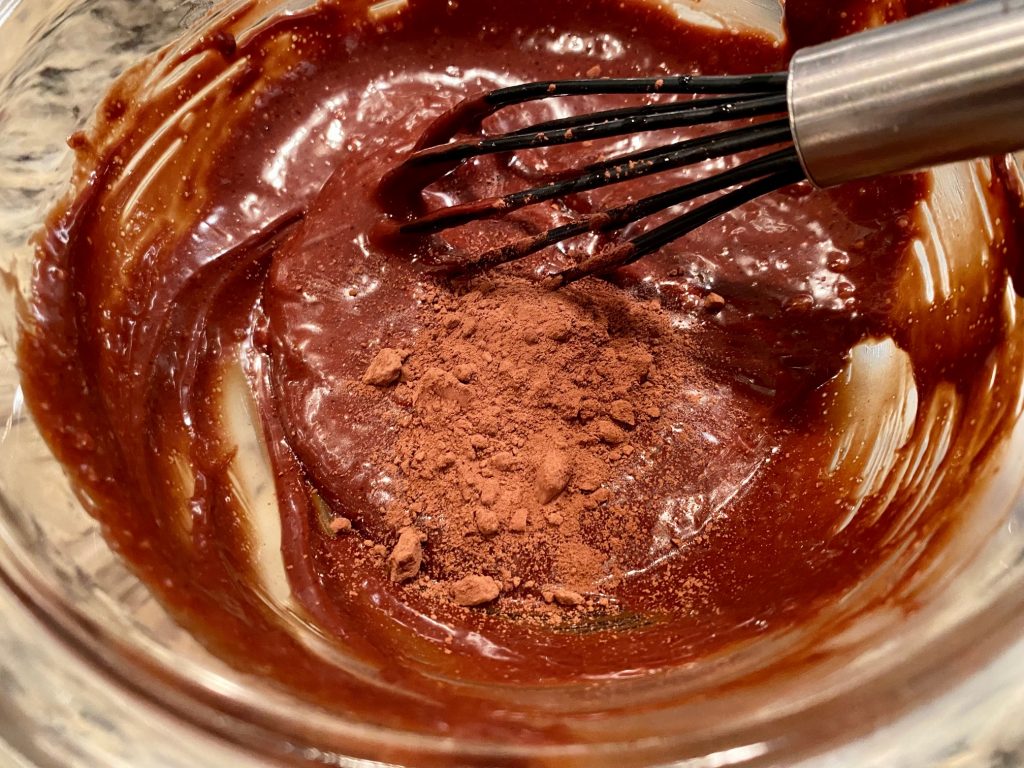
DO NOT SKIP THIS. It makes a huge difference in your final cake texture. See pics above for what it looks like. The first pic below is before, and the second pic is after the extra stirs…it’s smoother, glossier, and pulls away from the side a bit.


Finally, add the cocoa powder and whisk until combined.
Spoon the batter into your prepared ramekin. If you’re adding a filling, all you have to do is spoon half the amount of batter into the ramekin, add a centered dollop of your filling, and spoon the remaining batter on top.


Bake 7 to 9 minutes (7 will be the most molten in the center, 9 still plenty gooey; mine always need 8 or 9 minutes, occasionally a minute or two longer).
Transfer to a cooling rack for a minute. I take my mini offset spatula or a butter knife and very lightly go around the edge of the cake, just to loosen it more cleanly.

Then (wearing pot holders), place a small dessert plate over the ramekin and carefully flip the whole thing over. Count to ten, maybe give it a gentle shake, then pull the ramekin away…leaving (hopefully) your molten lava cake.
Dust with powdered sugar and serve as-is or with berries, barely sweetened whipped cream, or a little ice cream. Eat immediately.


, naturally gluten-free, & delicious. Make this easy single-serve dessert any day of the week. Single-serving lava cake recipe! #singleserve #lavacake #chocolate #easydessert #gf #glutenfree")
I truly can’t get enough of the texture…it’s delicate, airy, and bittersweet, perfect for any occasion (including a random Tuesday night).
Other easy & delicious GF chocolate treats you’ll love:
- Chocolate, Cinnamon, & Almond Loaf Cake
- Chocolate Almond Tartine (cake!) with Jam Swirls
- A Flourless Chocolate Cake I Actually Love
- GF Chocolate Financiers
- The Most Addictive Dark Chocolate Sea Salt Puppy Chow
- How to Make a Traditional Chocolate Soufflé
The recipe is below, and don’t be put off by the detailed instructions and notes…this really is EASY and super fast. But the details matter quite a bit in the final product (and you can make some choices based on your tastes), so I’ve tried to give as much instruction as possible.
I also strongly recommend using a digital scale…when you’re dealing with such tiny amounts, it makes a huge difference in the texture of the final product!
For the “most of an egg”, you kind of have to judgment call this one…I tend to use about 2/3 of an egg but it’s not an exact science (I just use the eggshell to divide it). You could also beat a whole egg and then pour about 2/3 in. But I’d say more than 1/2 and less than 1 full, exact isn’t critical.
Original recipe from Smitten Kitchen
Pin for later!
, naturally gluten-free, & delicious. Make this easy single-serve dessert any day of the week. Single-serving lava cake recipe! #singleserve #lavacake #chocolate #easydessert #gf #glutenfree")

The Most Perfect Single-Serving Chocolate Lava Cake (GF)
Ingredients
- 2 tablespoons 27 g unsalted butter, cut into chunks
- 1.5 ounces 43g of bittersweet chocolate, roughly chopped
- Strong pinch of flaky sea salt
- Heaping 1/2 tablespoon or up to 1 tablespoon, of granulated sugar
- 1 large egg *most* of it...see notes
- 1 teaspoon of good dark cocoa powder plus more for dusting
Instructions
- Heat oven to 450 F. Brush a 6-ounce ramekin or baking cup with melted butter, making sure not to miss any spots (I usually just melt a little more than the 27g total and then use some of it to coat the ramekin, and the rest in the cake). Spoon a little cocoa powder in and pat it around so it coats the bottom and sides, then knock the excess out.
- In a medium heatproof bowl, put the butter and chocolate pieces and melt them about two-thirds of the way. There are two ways you can do this, either in the microwave or set over a pot of simmering water---I do the microwave, about 15-20 seconds at a time and stirring in-between. You don't want it all the way melted because it will be too hot to add the egg.
- Whisk until it finishes melting and then whisk in the sugar and salt. Whisk in the egg and beat it until mixed in, and THEN add a good 20 to 30 extra times. This ensures that the mixture is smooth, glossy, and lightened a bit. DO NOT SKIP THIS. It makes a huge difference in your final cake texture. See pics above for what it looks like.
- Finally, add the cocoa powder and whisk until combined.
- Spoon the batter into your prepared ramekin. If you're adding a filling, see notes below on how to do this (peanut butter is a fave of mine!).
- Bake 7 to 9 minutes (7 will be the most molten in the center, 9 still plenty gooey; mine always need 8 or 9 minutes). Transfer to a cooling rack for a minute. I take my mini offset spatula or a butter knife and very lightly go around the edge of the cake, just to loosen it more cleanly.
- Then (wearing pot holders), place a small dessert plate over the ramekin and carefully flip the whole thing over. Count to ten, maybe give it a gentle shake, then pull the ramekin away...leaving (hopefully) your molten lava cake.
- Dust with powdered sugar and serve as-is or with berries, barely sweetened whipped cream, or a little ice cream. Eat immediately.
Notes
- I tried cutting corners on melted butter and cocoa powder to prepare the ramekin and had them stick every time, so don't skip this (and yes, butter seems to be much better than cooking spray).
- Use a *quality* chocolate for this, as it comprises a huge amount of the flavor and texture. Guittard, Ghiradelli, and others are good.
- The sugar can be flexible here depending on your taste and the type of chocolate you're using. My preference is using a solidly bittersweet chocolate (70 to 72%), and in that case I use a slightly heaping 1/2 tablespoon of sugar, maybe a tiny bit more because I like it less sweet. With a more semisweet chocolate (~60%), you could use even less.
- For the "most of an egg", you kind of have to judgment call this one...I tend to use about 2/3 of an egg but it's not an exact science (I just use the eggshell to divide it). You could also beat a whole egg and then pour about 2/3 in. But I'd say more than 1/2 and less than 1 full, exact isn't critical.
- You can put a spoonful of almost anything inside that you wish to merge with the molten center, and I almost always do this. All you have to do is spoon half the batter into the ramekin, add a centered dollop of your filling, and spoon the remaining batter on top. Peanut butter is my favorite, and I've done tart cherry jam, my peanut butter balsamic caramel (YUM), and you can get creative.
- You can also flavor the batter with citrus zest, espresso powder, extracts, or anything else that strikes your fancy (but doesn't change the batter consistency).
- You can make the batter and fill the prepared cup, then refrigerate until you want to bake it. They go into the oven directly from the fridge, but will need to bake 1 to 2 minutes longer. This works fine though after extensive testing I'd still say making it fresh has a *marginally* better texture.


Hello! Former food blogger here! I literally just got done devouring this recipe and it deserves a review! I was really wanting something rich and chocolaty but I was so sick of the nasty pasty microwave mug cakes, so I searched for “single serve mug cakes” and noticed yours at the top but with no review. So I decided to give it a try. Let’s just say this recipe was absolutely what I was looking for! Thorough description and it came out perfectly! I used salted butter and only had dark chocolate chips on hand, and it still came out impeccable! The peanut butter was a MUST and a scoop of vanilla ice cream complimented it perfectly. Keep up the good work! I’ll be coming back to this recipe for sure!
Hi Emily! I’m so glad…I really love this recipe, and make it pretty frequently. I totally agree with you on most mug cakes, I’m always disappointed. It’s pretty dangerous for me to know I can have this ready in 15 minutes 🙂
Yes. Dangerous. I’m back again making for the second day in a row 😆
Correction: I searched for “single serve lava cakes”
Hi! I cannot find the note for *most* of the egg. Can you please explain how much? Thank you
Hi Hope! I’ve added a specific note…it’s really not exact, more of a judgment call. I think I use around 2/3 of the egg but just use the eggshell to split it. You could beat a whole egg and then just pour 2/3 in if you wanted. But basically “more than 1/2 and less than 1 full egg” 🙂 The recipe is flexible enough to handle that. Hope that helps!
Thank you! And i have one more question. I have a 7oz ramekin, not a 6. Will that change the baking time? Is there something i should look for to see if its ready?
It may change it a bit, but the total ounces of the ramekin matter less than how deep or wide it is. If it’s a similar shape as the ramekins I show in the post, I don’t think the time would change much. If it’s a lot skinnier and deeper (which I don’t recommend), you’d need to bake it longer but it will be hard to get the inside cooked yet still gooey.
As far as knowing it’s done, it’s really hard to say…it shouldn’t have a ton of jiggle or liquid-yness in the middle (but just a bit of wobble), and it will have dipped a bit. It should look like the photo I have in the post where it’s still in the ramekin…shiny on top but not wet, you should be able to touch it with your finger and it not get batter on it. You’ll get an instinctive feel for it over time, it sometimes takes a couple tries to get it perfect.
I tried it, was fantastic! It was really easy, I used Ghirardelli dark chocolate morsels and got away with expired Hershey’s cocoa powder (12/2023) and 1/2 tsp coconut sugar.
Thank you!
Can I sub the chocolate for chocolate syrup?
Nevermind, I found out the hard way 😂don’t use chocolate sauce.
Haha good to know–sometimes trying it is the best way! 🙂