finding time for cooking

for the time-starved or curious culinary adventurer

  • Recipes By Type
    • Appetizers, Dips, & Snacks
    • Bread Recipes
    • Breakfast Goodies
    • Desserts
    • Main Dishes
    • Side Dishes & Veggies
    • Sauces, Spices, & Other Basics
    • Snacks
  • Drinks: Cocktails & More
    • Best Cocktail Gifts: For the At-Home Bartender or Mixologist
  • Foods I’m Obsessed With
    • 30 Minutes or Less…for the Time-Challenged Cook
    • What Bread To Make (Based on Your Time)
    • Gluten-Free Recipes
    • Pasta Recipes
    • Super Healthy
    • Cooking for One
    • Soup
    • Unleavened Bread Recipes
  • About Me
    • Get In Touch!
    • How-Tos
    • Kitchen Tools I’m Obsessed With
    • Recipes Index
    • Food and Travel—Two of My Favorite Things
    • Bunion Surgery Recovery Tips

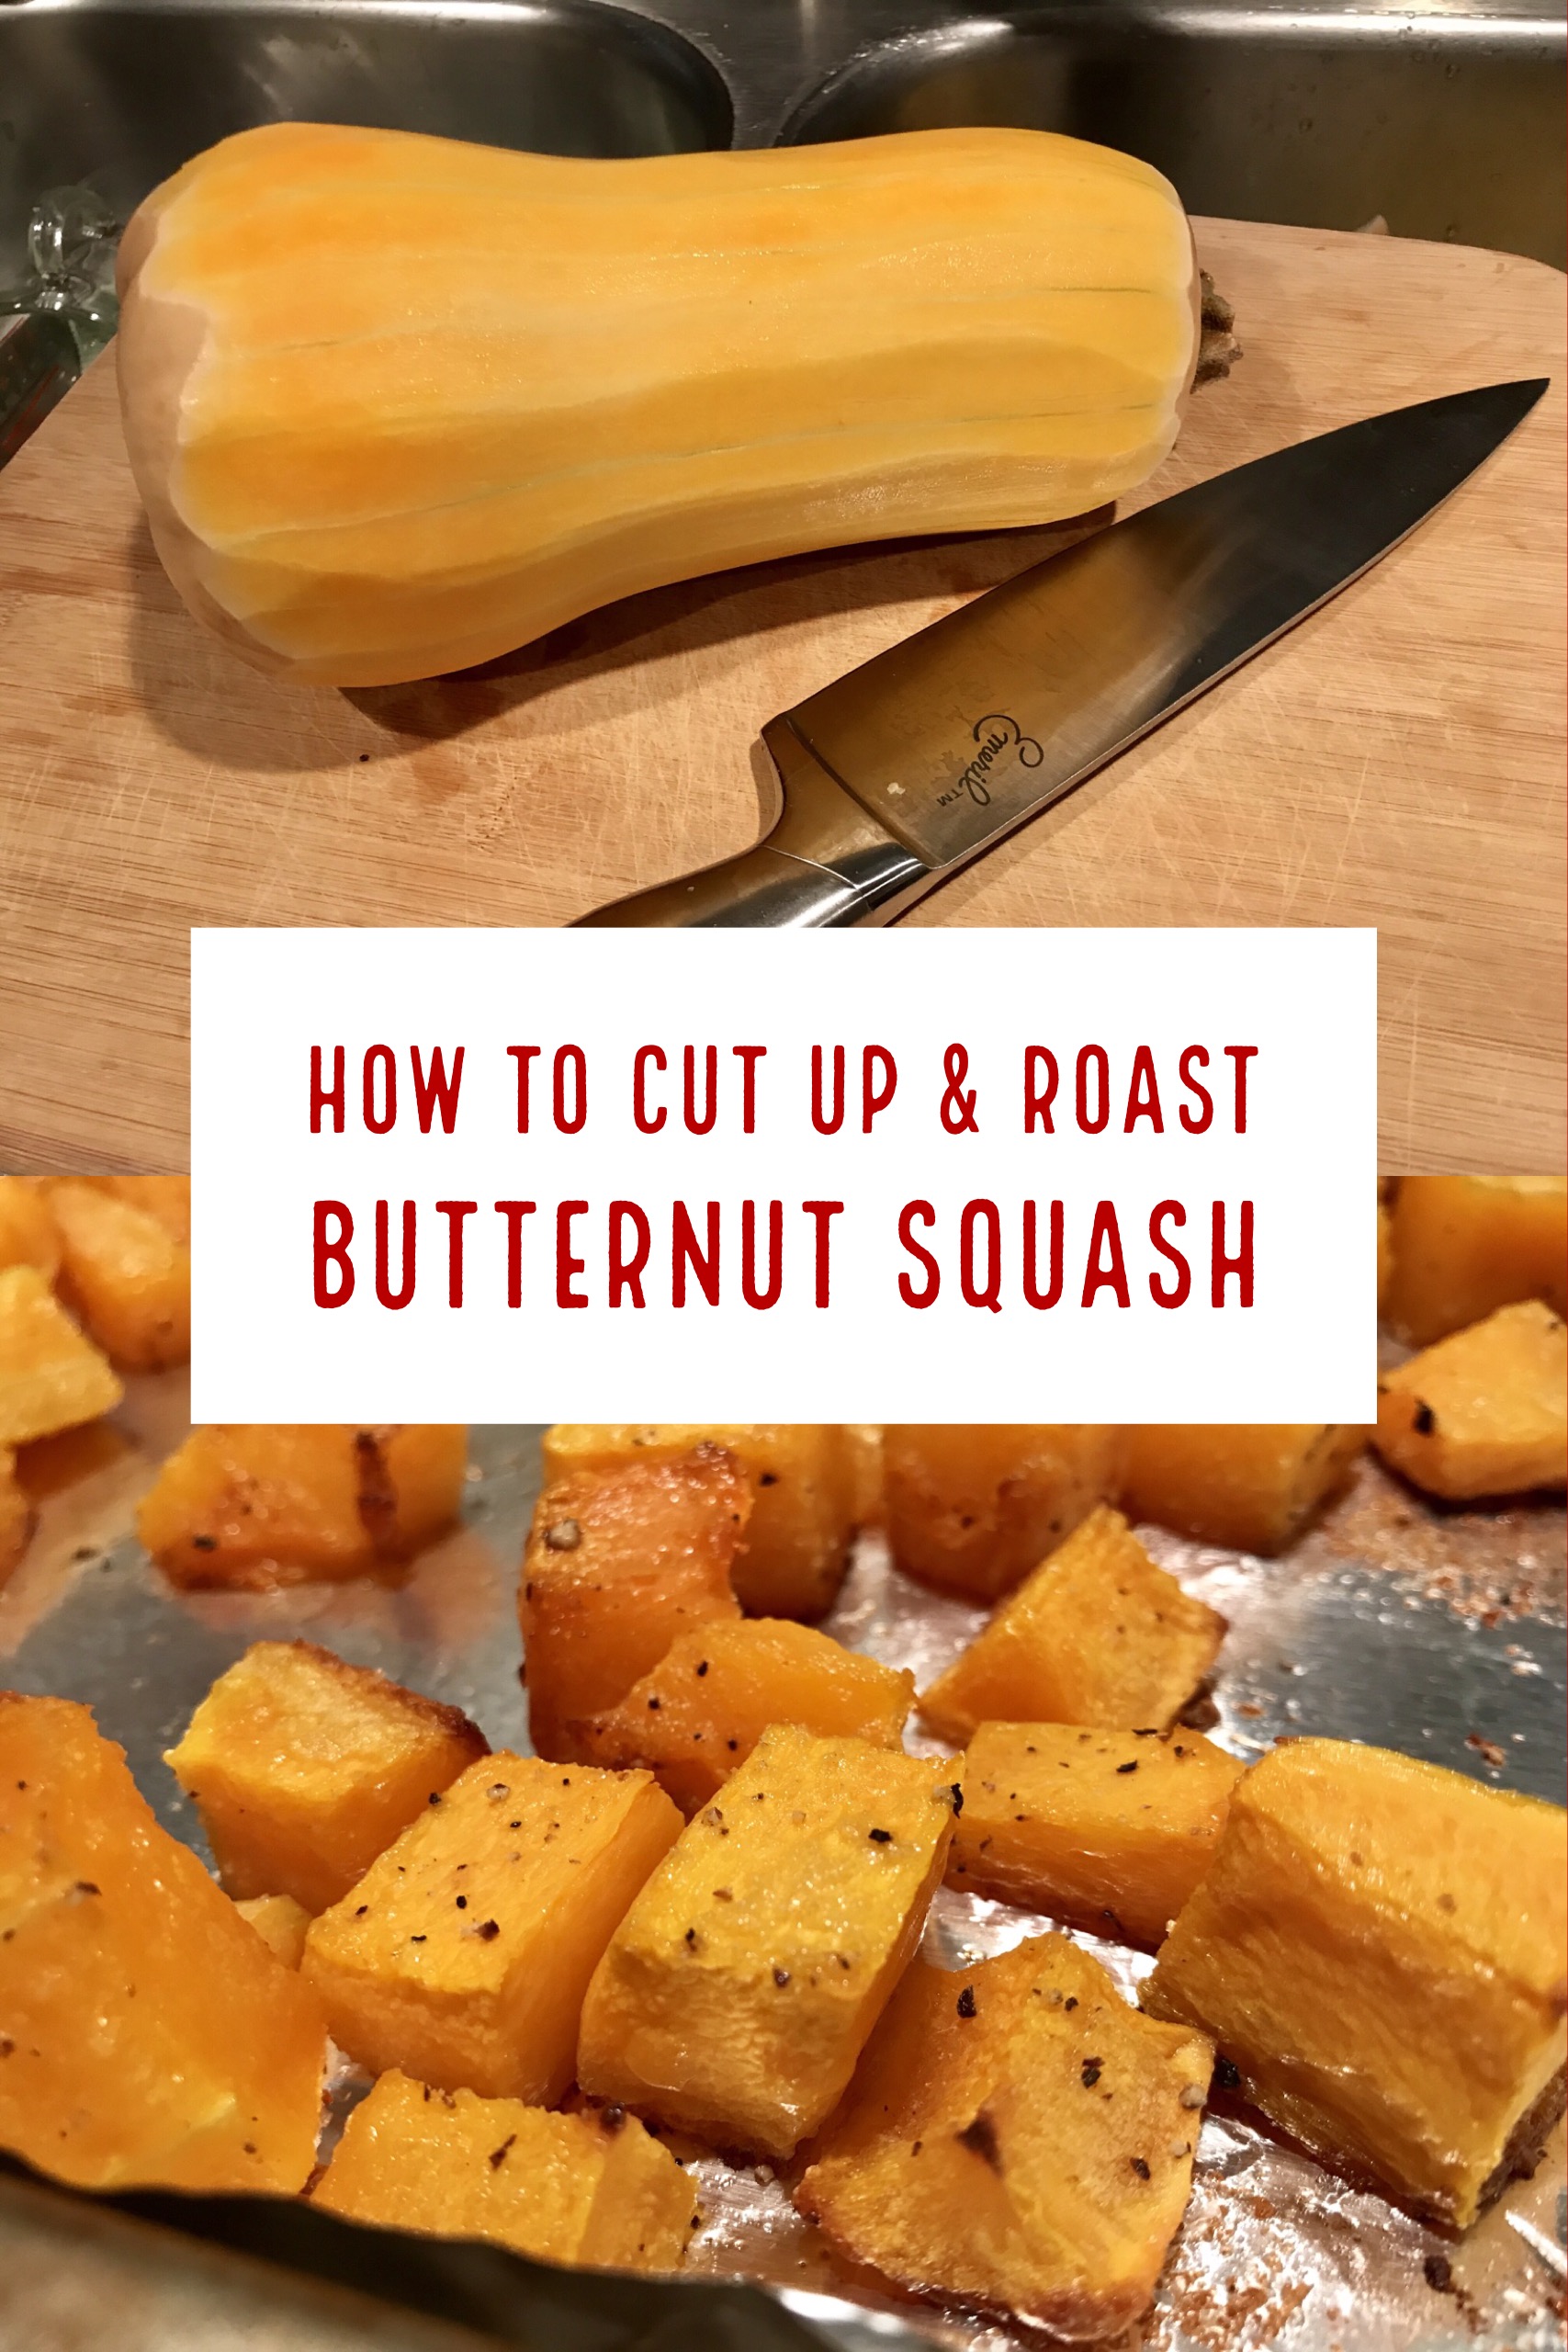
How To Cut Up a Butternut Squash (& Roast It)

November 5, 2017

It’s fall, so you know what that means…

No, I’m not talking about festive Starbucks cups and new fall TV shows.  It means that hundreds of butternut squash recipes are flooding Pinterest.  You’re probably getting seduced by them as we speak.  And then you remember that getting a butternut squash from whole into bite-sized pieces is THE WORST.

Until you know how to do it well.  So that’s where I come in.  I’ve found and refined a way to dismember butternut squash that doesn’t take long, doesn’t kill your hands, and will get you perfect little cubes every time.  Sure, you can sometimes buy it pre-cut (and there’s nothing wrong with that), but you can’t always find it that way plus it gets kind of slimy fairly fast.  Better to have a good back-up.

So let’s dive in, shall we?  There are two main pieces of equipment that you need, and one of them is an actual decent Y-peeler.  I’m in love with my OXO peeler, got it a few years back and now no longer accidentally take off layers of skin when I’m peeling veggies.  It gives you so much more leverage and stability than a regular vertical-bladed peeler.

Begin peeling long, deep strips out of the squash.  You’ll need to overlap your stripes, because it will likely take two tries to get it deep enough.  Butternut squash peel is not messing around.

Once you’ve peeled all the way around, get your knife out.  That’s the other key piece of equipment you need, a BIG ASS knife.  I have an 8″ chef’s knife for this that is perfect.  The shape is better for what we’re doing than a santoku.  I grabbed my knife set four or five years ago on one of those Good Morning America deals and I totally love it.

Slice off the ends of the butternut squash, and then cut it in half right where it starts to balloon out.

Take the smaller symmetrical half and cut it in half length-wise, then flip each flat side over and dice into even pieces.

The half that has kind of a buddha belly is a little more complicated.  Cut it in half length-wise as well, then take a knife or sharp spoon and dig out the weird spongy stuff and the seeds and throw that away.  Then flip those halves over and *very carefully* dice those too—I say very carefully because they have a tendency to slip and cause you to almost cut off your finger.

And voila, you’ve cut up a butternut squash.  Despite being challenging to chop and having very thick skin, if you approach it in pieces this way it’ll go really quickly.

A few of my favorite butternut squash recipes

Quinoa Salad with Butternut Squash & Dried Cranberries

Mac & Cheese with Roasted Butternut Squash, Kale, & Chicken Sausage

Butternut Squash & Sage Lasagna

Butternut Squash Risotto with Fresh Basil

Or my perennial fave, just roast it

If you’re wanting to roast up your squash, pre-heat your oven to 400 F, or even 425 if you’re feeling sassy.  You can also start it at 400 and then about 10-15 minutes into roasting turn it up to 425.  Roasted veggies are very forgiving.  Line a baking sheet with aluminum foil and toss your squash cubes on there.  Drizzle with about 2 tablespoons of olive oil and use your hands to make sure it gets covered.  Season with fresh-ground salt and pepper, and some garlic salt (my vegetable secret weapon).

Roast for around 20 minutes, possibly a little more to get it to start looking caramelized and a little burnt/crispy.

How to cut up butternut squash

  1. Using a Y-peeler, peel long, deep strips out of the squash length-wise.  You’ll need to overlap your stripes, because it will likely take two tries to get it deep enough (and you want to really see the orange).
  2. Slice off the ends of the butternut squash, and then cut it in half right where it starts to balloon out.
  3. Take the smaller symmetrical half (the neck) and cut it in half length-wise, then flip each flat side over and dice into even pieces.
  4. For the half that is more rounded, cut it in half length-wise, then take a knife or sharp spoon and dig out the weird spongy stuff and the seeds and throw that away.
  5. Flip those halves over and *very carefully* dice those too, but be careful because they have a tendency to slip and cause you to almost cut off your finger.
  6. And you’re done!

How to roast butternut squash

  • Pre-heat your oven to 400 F and line a baking sheet with aluminum foil.
  • Toss your squash cubes on there, drizzle with about 2 tablespoons of olive oil and use your hands to make sure it gets covered.
  • Season with fresh-ground salt and pepper, and some garlic salt—my secret weapon for delicious veggies.
  • Roast for 10 minutes, then turn the oven up to 425 F and roast for another 10-15 minutes, possibly a little more to get it to start looking caramelized and a little burnt/crispy.

How to cut up & roast butternut squash easily, easy instructions for peeling & dicing without hurting your hands

Leave a Comment CATEGORIES // Go-To Recipes, How-Tos, Super Healthy

« Best Gluten-Free Recipes for the Holidays
Dark Chocolate Stout Cake with Peanut Butter Frosting + Happy Birthday to Me! »

Leave a Reply Cancel reply

Your email address will not be published. Required fields are marked *

This site uses Akismet to reduce spam. Learn how your comment data is processed.

About Me

Welcome to my little corner of the internet! I created this blog for people who love cooking & baking but are challenged to find the time and energy to do it. Recipes run the gamut from super healthy to indulgent, but the focus is on using REAL food no matter what.

Follow Along!

  • Bloglovin
  • Facebook
  • Instagram
  • Pinterest

Recent IG Adventures!

I honestly feel bad not having shared this with yo I honestly feel bad not having shared this with you sooner, because I am addicted to this intense & indulgent dark chocolate "nice cream" right now. 

Made using frozen bananas and dutch-process cocoa powder, it feels rich, complex, & satisfies any sweet craving I have, but is naturally free of gluten, dairy, and processed sugars. It takes like 3 minutes and 3 ingredients to make--wins all around!

To get the recipe/technique, tap the link in my IG bio (@findingtimeforcooking) and tap on this photo! 

#darkchocolate #nicecream #healthydesserts #dairyfreedessert
This easy strawberry mint syrup is a perfect way t This easy strawberry mint syrup is a perfect way to "level up" your summer cocktail game...and use up the mid-summer strawberry bounty. Making your own simple syrup is crazy easy, and only takes a few minutes! 🍓

To get the recipe, tap the link in my IG bio (@findingtimeforcooking) and click on this photo! #simplesyrup #strawberrymint #summercocktails #strawberries
Be still my heart! This traditional Irish brown br Be still my heart! This traditional Irish brown bread is so easy to make, packed with whole grains, & instantly transports me back to breakfasting in a cozy B&B in Ireland 😍

See how to make it yourself by tapping on the link in my IG bio & picking this photo —> @findingtimeforcooking 
#irishbrownbread #irishfood #breadbaking #bakingfromscratch
I’ve got the 10-minute side dish you need in you I’ve got the 10-minute side dish you need in your life…air fryer green beans a.k.a green bean fries!! I don’t even like green beans but this dish makes me a believer…and has been a lifesaver recently when I don’t want to turn my oven on in this brutal heat 🙄

Tap the link in my IG bio & click on this photo to get the recipe! —> @findingtimeforcooking 
#greenbeans #greenbeanfries #airfryer #healthyrecipes
This gin-based “hard” cherry limeade is the pe This gin-based “hard” cherry limeade is the perfect summer nostalgia…now all I need is some cheddar poppers from Sonic ☀️😜

Tap the link in my IG banner to get the (super easy) recipe! —> @findingtimeforcooking 

#cherryliqueur #cherrylimeade #summercocktails #sanguemorlacco
Getting to the perfect salted peanut butter chocol Getting to the perfect salted peanut butter chocolate shortbread cookie was QUITE the journey...but I absolutely love this final version.  Even better, the dough log keeps in the freezer so you can slice off a few cookies any time a craving strikes! 

Tap the link in my IG bio to get the recipe! —> @findingtimeforcooking 

#peanutbuttercookies #cookies #bakingfromscratch #sliceandbake
An easy 10-minute spiced chickpea scramble that is An easy 10-minute spiced chickpea scramble that is full of flavor (I *always* accidentally make it too spicy), versatile, and a great plant-based lunch option. For me on a gut health/candida diet, this has become a go-to recipe when I need something fast!

Check out the recipe by clicking on the link in my IG bio & tapping this photo! 

#chickpeas #veganrecipes #plantbased #candidadiet
This basil gin smash is the summer cocktail you NE This basil gin smash is the summer cocktail you NEED! It’s delicious, ultra refreshing, & so easy…just a couple ingredients (critically, good fresh basil), 1 minute to shake, & you’ll be sipping tart herbaceous goodness.

Click the link in my IG bio & tap this pic to see the (crazy easy) recipe! —> @findingtimeforcooking  #summercocktails #ginsmash #freshbasil #gincocktail
I’ve got savory, carb-y goodness comin’ at ya I’ve got savory, carb-y goodness comin’ at ya today, and who doesn’t love that?! A really good authentic focaccia requires at least 18-24 hours to make, but this "quick" Rosemary & caramelized onion version can be done in around 4 hours and is SO good!

See the recipe by tapping the link in my IG bio & choosing these pics! —> @findingtimeforcooking 
#focaccia #easyfocaccia #breadrecipe #bakingfromscratch
Load More... Follow on Instagram

Popular Posts

Dutch Monkey Doughnuts – a fun twist on the classics

Maple-Glazed Chicken With Sweet Potato Hash

Orange, Apricot, & Pistachio Biscotti

Pasta with Fresh Sweet Corn Pesto

Lemon Shallot Chicken

Recent Posts

  • Sweet Potato “Toast” with Guacamole &#…
  • Celebrating 10 Years of DELICIOUSNESS!
  • The Most Addictive, Indulgent-Feeling Dark Chocola…

Categories

  • Appetizers, Dips, & Snacks
  • Bread Recipes
  • Breakfast Goodies
  • Cooking for One
  • Desserts
  • Drinks: Cocktails & More
  • Eating Out
  • Family Secret Recipes
  • Food-Related Miscellany
  • Foods I'm Obsessed With
  • Gluten-Free Recipes
  • Go-To Recipes
  • How-Tos
  • Kitchen Gear
  • Main Dishes
  • Pasta Recipes
  • Recipe Experimentation
  • Sauces, Spices, & Other Basics
  • Side Dishes & Veggies
  • Snacks
  • Soup
  • Super Healthy
  • Travel and Food
  • Uncategorized

Privacy Policy & Disclosures

Copyright & Terms of Use

Copyright 2022 Finding Time For Cooking

3 shares