Caramelized White Chocolate & Coffee Tarts (Happy Birthday Part 2)
I have to say, these 100% met my criteria for birthday desserts. Unique, totally delish, and something that was a bit more complicated than my usual…stretched my skills a bit. Yep, these caramelized white chocolate and coffee tarts are a WINNER on every level.
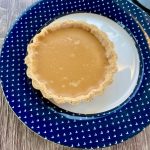
 coffee tarts are quite unique with the addition of caramelized white chocolate...the slightly burnt toffee notes cut the overwhelming sweetness. Perfect for a special occasion, great make-ahead dessert. #coffeetarts #tartrecipe #caramelizedwhitechocolate #blondechocolate")
I was a bit all over the place when it came to choosing my birthday dessert this year, partly because my birthday fell during our Feast of Tabernacles so I was out of town.
I also just had trouble deciding…so I didn’t. Just like my 30th birthday when I made BOTH a whole lemon tart and chocolate stout cake, I gave myself a two-fer. First I tackled this complicated and insane 10-layer Russian burnt honey cake (which my sister declared should make all other cakes feel embarrassed).
And now I’ve got something for you that just captured my imagination. When I first read about caramelizing white chocolate, I was intrigued since I hate white chocolate. The science of it was really interesting, so I gave it a try and was obsessed!
And I’d been toying with the idea of a coffee tart, so when I realized that the recipe I was considering had white chocolate as the base, I knew I needed to mash up the two. The caramelized white chocolate adds such depth to the overall flavor, bringing a slightly bitter note of burnt toffee that cuts the sickly sweetness.

These coffee tarts are the perfect make-ahead dessert as well, since they require several hours of chilling once you pour the filling in. So you can make them a day or two ahead of when you need them, as long as you have the fridge space for them to hang out.
They’re also not difficult. The main thing is planning ahead enough for the various stages, since both the tart dough and the filling require chilling.
 coffee tarts are quite unique with the addition of caramelized white chocolate...the slightly burnt toffee notes cut the overwhelming sweetness. Perfect for a special occasion, great make-ahead dessert. #coffeetarts #tartrecipe #caramelizedwhitechocolate #blondechocolate")
Try this next! Lemon-Cherry Almond Tart with Rosemary Shortbread Crust
So first we make the tart dough. In a medium bowl (not your stand mixer!), sift together your dry ingredients (flour, powdered sugar, almond flour, and salt). Note, do not be like me—make sure you have super fine blanched almond flour without any skins.
Add your very cold butter cubes and rub the mixture between your hands until it becomes a sand-like consistency. Move as quickly as you can so the butter doesn’t get too melty.


Add the beaten egg into the mixture and mix with your hands just until the dough comes together.
I totally missed taking a pic of the “bringing it together” step, but what you need to know is it is SOOOOO crumbly. But I trusted in the process and kept squeezing and gently kneading it together.
Knead with the palm of your hand for a minute or two (do not over-knead and do not use mixer), just until the dough becomes smooth.

If the dough is too warm and sticky, place it into the fridge for 10-15 minutes first. Otherwise continue with rolling the dough out into 2mm thickness (very thin, less than 1/10th of an inch) between two silicone baking mats.
Place the dough in the freezer for 15 minutes (still between the two baking mats).


Get your tart cases ready. I recommend loose-bottom ones (I used these).
Take the dough out from the freezer, remove the top silicone mat and put it on a baking sheet. Cut out rough circles a bit bigger than your tart cases (leaving enough dough to go up the sides plus some extra). Gently move the dough into the tart case (I used my scraper tool to help).
If at any point the dough gets too warm to work with, pop it back into the freezer for 5 minutes. It’s extremely important to work with a dough that’s cold enough to be handle easily (not sticky), but not so cold it breaks easily.
Press the dough into each tart case, making sure to get it into the cracks and crevices. Work it all the way up the sides and leave a little extra (you’ll cut it off later).
Put the tart cases on the baking sheet and put in the freezer for 1 hour.


Pre-heat oven to 160C / 320F. After 1 hour take the pastry dough with the rings on them out and trim them with a sharp knife so they have clean edges.


Bake for 20-30 minutes, until golden brown and starting to set. Let them cool on the sheet or a cooling rack before filling.


Once your tart shells are almost cool, we’re ready to make this into an epic caramelized white chocolate and coffee tart!
Chop the caramelized white chocolate into small-ish pieces and set aside in a bowl. This post goes into detail on how to make it, but just know it’s SO easy! All you need is high-quality white chocolate (like a Valrhona, Ghiradelli, etc.), and oven, and a bit of time.
Brew the fresh coffee or espresso and mix it with cream in a small saucepan. Heat over medium (or medium-low) until JUST simmering.


Pour warm cream coffee mixture over chocolate OR just throw the chocolate in with the crema mixture and gently whisk together.
You can even take it off the burner to do this, the heat of the liquid will be enough.


Once the tart shells are cooled to room temperature, pour the warm ganache into the tart shells. Smooth the top with an offset spatula if needed.
I kept the pastry shells in the tart cases to make for easier movement without fear of them falling apart.


Chill in the fridge for minimum 4 hours before serving or decorating with whipped cream.
You can wait an hour or two into the chilling and then sprinkle a bit of flaky sea salt on top, to balance the sweetness of the filling.
 coffee tarts are quite unique with the addition of caramelized white chocolate...the slightly burnt toffee notes cut the overwhelming sweetness. Perfect for a special occasion, great make-ahead dessert. #coffeetarts #tartrecipe #caramelizedwhitechocolate #blondechocolate")
 coffee tarts are quite unique with the addition of caramelized white chocolate...the slightly burnt toffee notes cut the overwhelming sweetness. Perfect for a special occasion, great make-ahead dessert. #coffeetarts #tartrecipe #caramelizedwhitechocolate #blondechocolate")
It’s hard to even describe how interesting the flavors are in these coffee tarts, with the strong espresso flavor deepened by the kind of burnt toffee notes coming from the caramelized white chocolate. They’re not difficult, just time consuming, and perfect for making ahead!
Other special birthday desserts you’ll love:
- Red Wine Chocolate Cake
- How to Make Pasteis de Nata (the Iconic Portuguese Custard Tart)
- Smitten Kitchen’s Whole Lemon Tart
- “Elvis” Banana, Salted Honey, & Peanut Butter Cream Puffs
- Vanilla Almond Cupcakes with Peach Jam Filling
- Not a birthday dessert but should be: Apricot Linzer Torte
- Another French-inspired delicacy: The Lazy Person’s Kouign Amann
You can read a super detailed post on this tart crust here. I used Spatula Desserts recipe for the coffee tart ganache, but swapped out caramelized white chocolate instead.
A few notes before we began:
- You can cut your butter into small chunks and put in the freezer for 15 minutes before making the tart dough.
- I didn’t have perforated tart rings or a perforated mat at the time (I do now!) but instead used what I had already. See the original recipe’s instructions if you have those items. I used these small loose-bottom fluted tart pans (as well as one larger one)
- I do really recommend using the weight measurements rather than trying to convert to U.S. cups. A good digital kitchen scale is only like $10 and makes a big difference…being precise in baking tends to matter.
- While I loved the recipe overall, the tart crust wasn’t my favorite so if you have a preferred pastry crust I’d go with that.
- The caramelized white chocolate makes a big difference in the flavor here and is so easy to make! All you need is high-quality white chocolate and an oven. Here are my step-by-step instructions.
Caramelized White Chocolate & Coffee Tarts
For the Pâte Sablée
- 90g of powdered sugar (confectioner’s sugar)
- 230g of pastry flour (you can substitute all-purpose)
- 30g of almond flour (without skin, as finely ground as possible)
- Pinch of salt
- 110g of unsalted butter, very cold
- 50g of egg, room temp and beat slightly (approximately 1 egg)
For the caramelized white chocolate coffee ganache
- 400g of caramelized white chocolate (very good quality, e.g. Valrhona)
- 250g of heavy whipping cream
- 50g of freshly-brewed coffee (I recommend espresso)
- Optional: flaky sea salt (like this Maldon)
- Optional: Whipped cream for decoration
Make the dough
- In a medium bowl (not your stand mixer!), sift together your dry ingredients (flour, powdered sugar, almond flour, and salt).
- Add your very cold butter cubes and rub the mixture between your hands until it becomes a sand-like consistency. Move as quickly as you can so the butter doesn’t get too melty.
- Add the beaten egg into the mixture and mix with your hands just until the dough comes together.
- Knead with the palm of your hand for a minute or two (do not over-knead and do not use mixer), just until the dough becomes smooth
- If the dough is too warm and sticky, place it into the fridge for 10-15 minutes first. Otherwise continue with rolling the dough out into 2mm thickness (very thin, less than 1/10th of an inch) between two silicone baking mats.
- Place the dough in the freezer for 15 minutes (still between the two baking mats).
- Take the dough out from the freezer, remove the top silicone mat and put it on a baking sheet. Cut out rough circles a bit bigger than your tart cases (leaving enough dough to go up the sides plus some extra). Gently move the dough into the tart case (I used my scraper tool to help).
- If at any point the dough gets too warm to work with, pop it back into the freezer for 5 minutes. It’s extremely important to work with a dough that’s cold enough to be handle easily (not sticky), but not so cold it breaks easily.
- Press the dough into each tart case, making sure to get it into the cracks and crevices. Work it all the way up the sides and leave a little extra (you’ll cut it off later).
- Put the tart cases on the baking sheet and put in the freezer for 1 hour.
- Pre-heat oven to 160C / 320F. After 1 hour take the pastry dough with the rings on them out and trim them with a sharp knife so they have clean edges (see pics).
- Bake for 20-30 minutes, until golden brown and starting to set. Let them cool on the sheet or a cooling rack before filling.
Make the ganache filling & assemble
- Chop the caramelized white chocolate into small-ish pieces and set aside in a bowl.
- Brew the fresh coffee and mix it with cream. Heat the mixture in a small saucepan over medium (or medium-low) heat until JUST simmering.
- Pour warm cream coffee mixture over chocolate OR just throw the chocolate in with the crema mixture and gently whisk together. You can even take it off the burner to do this, the heat of the liquid will be enough.
- Once the tart shells are cooled to room temperature, pour the warm ganache into the tart shells. Smooth the top with an offset spatula if needed. I kept the pastry shells in the tart cases to make for easier movement without fear of them falling apart.
- Chill in the fridge for minimum 4 hours before serving or decorating with whipped cream. You can wait an hour or two and then sprinkle a bit of flaky sea salt on top, to balance the sweetness of the filling.
Pin for later!
 coffee tarts are quite unique with the addition of caramelized white chocolate...the slightly burnt toffee notes cut the overwhelming sweetness. Perfect for a special occasion, great make-ahead dessert. #coffeetarts #tartrecipe #caramelizedwhitechocolate #blondechocolate")
Caramelized White Chocolate & Coffee Tarts
Ingredients
- For the Pâte Sablée
- 90 g of powdered sugar confectioner's sugar
- 230 g of pastry flour you can substitute all-purpose
- 30 g of almond flour without skin, as finely ground as possible
- Pinch of salt
- 110 g of unsalted butter very cold
- 50 g of egg room temp and beat slightly (approximately 1 egg)
- For the caramelized white chocolate coffee ganache
- 400 g of caramelized white chocolate very good quality, e.g. Valrhona
- 250 g of heavy whipping cream
- 50 g of freshly-brewed coffee I recommend espresso
- Optional: flaky sea salt like Maldon
- Optional: Whipped cream for decoration
Instructions
- <b>Make the dough:</b> In a medium bowl (not your stand mixer!), sift together your dry ingredients (flour, powdered sugar, almond flour, and salt).
- Add your very cold butter cubes and rub the mixture between your hands until it becomes a sand-like consistency. Move as quickly as you can so the butter doesn't get too melty.
- Add the beaten egg into the mixture and mix with your hands just until the dough comes together.
Knead with the palm of your hand for a minute or two (do not over-knead and do not use mixer), just until the dough becomes smooth. - If the dough is too warm and sticky, place it into the fridge for 10-15 minutes first. Otherwise continue with rolling the dough out into 2mm thickness (very thin, less than 1/10th of an inch) between two silicone baking mats.
- Place the dough in the freezer for 15 minutes (still between the two baking mats).
- Take the dough out from the freezer, remove the top silicone mat and put it on a baking sheet. Cut out rough circles a bit bigger than your tart cases (leaving enough dough to go up the sides plus some extra). Gently move the dough into the tart case (I used my scraper tool to help).
- If at any point the dough gets too warm to work with, pop it back into the freezer for 5 minutes. It's extremely important to work with a dough that's cold enough to be handle easily (not sticky), but not so cold it breaks easily.
- Press the dough into each tart case, making sure to get it into the cracks and crevices. Work it all the way up the sides and leave a little extra (you'll cut it off later).
- Put the tart cases on the baking sheet and put in the freezer for 1 hour.
- Pre-heat oven to 160C / 320F. After 1 hour take the pastry dough with the rings on them out and trim them with a sharp knife so they have clean edges (see pics).
- Bake for 20-30 minutes, until golden brown and starting to set. Let them cool on the sheet or a cooling rack before filling.
- <b>Make the ganache filling & assemble:</b> Chop the caramelized white chocolate into small-ish pieces and set aside in a bowl.
- Brew the fresh coffee and mix it with cream. Heat the mixture in a small saucepan over medium (or medium-low) heat until JUST simmering.
- Pour warm cream coffee mixture over chocolate OR just throw the chocolate in with the crema mixture and gently whisk together. You can even take it off the burner to do this, the heat of the liquid will be enough.
- Once the tart shells are cooled to room temperature, pour the warm ganache into the tart shells. Smooth the top with an offset spatula if needed. I kept the pastry shells in the tart cases to make for easier movement without fear of them falling apart.
- Chill in the fridge for minimum 4 hours before serving or decorating with whipped cream. You can wait an hour or two into chilling and then sprinkle a bit of flaky sea salt on top, to balance the sweetness of the filling.