A Home Baker Trying Out Samin Nosrat’s Ligurian Focaccia
I’ve been fascinated with the idea of trying out this Ligurian focaccia recipe ever since I watched the first episode of Samin Nosrat’s Salt, Fat, Acid, Heat on Netflix.
I’d intended to just have it on in the background, but found myself mesmerized by the gorgeously-shot slow, close-ups of bubbling dough, shiny olive oil pooling in dimples, flaky salt showering over a pan. It hooked me good.

Want the best, easiest focaccia ever? This recipe is my favorite.
I’d been meaning to try out this recipe for months, but stalled and hemmed and hawed…something about figuring out the long first rise time and when the final product would be ready (for dinner time, ostensibly) seemed to trip me up. I wanted to actually ENJOY making this, not feel rushed or only half paying attention.
That seems silly in hindsight. But since I had some time over the winter break period to do whatever, whenever, I “scheduled” it for one of those chilly days between Christmas and New Year’s (though I celebrate neither of those) when the time kind of blurs together.
No one is really working, you’re not getting bombarded with emails, and you can just kind of…coast. Drink coffee until it’s time to drink gin. Watch the classic black-and-white “New Moon” for the umpteenth time (no, not the Twilight movie…). Maybe organize your closet. Lose a few hours reading. Wonder if it’s Tuesday or Friday.

Another Ligurian staple: Traditional Ligurian Trofie Pasta by Hand (with Fresh Pesto)
And between doing those things you can do the few steps it takes to pretend you’re as awesome and knowledgeable as Samin Nosrat and throw together this Ligurian focaccia. You’ll mimic her gentle movements, the dreamy glug of olive oil and sprinkles of salt.
Or, honestly, you’ll rush each step but still make sure that it has plenty of time to rise (THIS IS CRITICAL), and still end up with an addictive crunchy, salty bread. Because I learned that this recipe is so simple that if you’re only half paying attention you can still end up in the same place. It takes patience in the rising, but the actual hands-on steps are so easy.
One other important thing here is to make sure you use super high-quality olive oil. I’m a huge fan of Brightland olive oils, they’re my go-to for this type of recipe where the taste and quality really matters. I rotate between different ones for this focaccia, but their Awake oil is a staple for this.

Don’t have 18+ hours? Try this “quick” rosemary & caramelized onion focaccia
What makes Ligurian focaccia different? Many people consider Ligurian focaccia (focaccia liguria, or sometimes focaccia genovese which is where the dimples are used) to be the most traditional Italian focaccia type, though there are other regional types.
You’ll find it all of the country, sometimes by itself or with toppings, or as the basis for sandwiches as well. If you see “pizza bianca” listed on a menu, this is basically just focaccia (sometimes with a little cheese as well) so don’t be expecting a real pizza.

So let’s try this, shall we??
In a medium bowl, stir together the water, yeast, and honey to dissolve.
In a very large bowl, whisk the flour and salt together, then add the water-honey-yeast mixture and the olive oil. Stir with a rubber spatula until just incorporated, then scrape the sides of the bowl clean and cover with plastic wrap. It will be rough and shaggy but that’s totally fine.


Leave out at room temperature (covered with the plastic wrap) to ferment for 12 to 14 hours, until at least doubled in volume. I do it overnight.


Once it’s risen, spread 2 to 3 tablespoons of oil evenly onto a 18-by-13 inch rimmed baking sheet. This is the time to use GOOD olive oil, as this is such a simple recipe it does really impart a lot of flavor. I have some from Argentina that I used this time.
Use a spatula or your hand to gently release the dough from the sides of the bowl and fold it onto itself gently, then pour it onto pan. Pour an additional 2 tablespoons of olive oil over the dough, and use your hand to spread it across.
Slowly and gently stretch the dough to the edges of the baking sheet by placing your hands underneath and pulling outward. The dough will continue to shrink a bit, so repeat the stretching once or twice over the course of 30 minutes to ensure the dough remains stretched.


At the end of the 30 minutes, “dimple” the dough by pressing the pads of your first three fingers in at an angle (don’t push all the way through the dough). Make the brine by stirring together the salt and water until salt is dissolved, then pour it over the dough to fill the dimples.
Set the focaccia aside to rise for 45 minutes until the dough is light and bubbly.


With 15 minutes left in that final rise, adjust your main oven rack to center position, and a second rack to the upper position. Preheat oven to 450°F.
If you have a baking stone, put it on the center rack, and otherwise invert another sturdy baking sheet and place it on that rack. Allow it to preheat with the oven until it’s very hot, before proceeding with baking.

Sprinkle the dough with flaky salt and bake for 25 to 30 minutes directly on top of the stone or inverted baking sheet, until the bottom crust is crisp and golden brown when checked with a metal spatula. To finish browning the top crust, move the focaccia to the upper rack and bake for 5 to 7 minutes more.
Remove from the oven and brush or douse with 2 to 3 more tablespoons of oil over the whole surface (don’t worry if the olive pools in pockets, it will absorb as it sits).


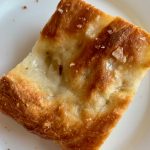
Seriously, doesn’t that look AMAZING!!!!
Let cool for 5 minutes, then release the focaccia from the pan with a metal spatula and transfer to a cooling rack. Let it cool for at least 30 minutes!


Serve warm or at room temperature. If, for some reason, you don’t immediately devour this and weirdly have leftovers, you can try to store it and keep it fresh.
To store, wrap in parchment and then keep in an airtight bag or container to preserve texture. Gently toast or reheat any leftover focaccia before serving. Alternatively, wrap tightly to freeze, then defrost and reheat before serving.


Save for later: A Tool to Decide What Bread to Make Based On How Long You Have…
The hardest part of making this Ligurian focaccia is waiting a little while until it’s cooled to tear into it…once I did, I devoured piece after piece of the golden, crunchy, salty perfection.
Eventually I surfaced from my carb insanity and sliced off about two-thirds of the loaf to take to my sister’s family (in order to save myself!).
I used Diamond Kosher Salt for the main bread and brine, and this flaky Maldon salt for finishing. I also recently picked up Samin’s book (also called Salt, Fat, Acid, Heat) and it’s so interesting to learn more about the techniques and scientific reasons that make this type of recipe so good!
Other amazing bread recipes you’ll love:
- Rosemary Olive Oil Bread with Sea Salt
- Easy, Awesome Challah Bread
- Flaky, Buttery No-Yeast Flatbreads
- “Quick” Rosemary & Caramelized Onion Focaccia (around 4 hours)
- …or a cheat 1(ish)-Hour Skillet Focaccia
I used this recipe from Samin Nosrat, via The Kitchn
Trying Out Samin Nosrat's Ligurian Focaccia
Ingredients
- For the dough:
- 2 1/2 cups of lukewarm water
- 1/2 teaspoon of active dry yeast
- 2 1/2 teaspoons of honey
- 5 1/3 cups of all-purpose flour
- 2 tablespoons of Diamond Crystal kosher salt or 1 tablespoon of regular fine sea salt
- 1/4 cup of extra-virgin olive oil plus more for the pan and finishing
- Flaky salt for finishing (I used Maldon)
- For the brine:
- 1 1/2 teaspoons of Diamond Crystal kosher salt or 3/4 teaspoon of regular sea salt
- 1/3 cup lukewarm water
Instructions
- In a medium bowl, stir together the water, yeast, and honey to dissolve.
- In a very large bowl, whisk the flour and salt together, then add the water-honey-yeast mixture and the olive oil. Stir with a rubber spatula until it's just incorporated, then scrape the sides of the bowl clean. It will be rough and shaggy but that's totally fine.
- Cover with plastic wrap and leave out at room temperature to ferment for 12 to 14 hours, until at least doubled in volume. I do it overnight.
- Once it's risen, get an 18-by-13 inch rimmed baking sheet and spread 2 to 3 tablespoons of olive oil onto it.
- Use a spatula or your hand to gently release the dough from the sides of the bowl and fold it onto itself gently, then pour it onto pan. Pour an additional 2 tablespoons of olive oil over the dough, and use your hand to spread it across the dough.
- Slowly and gently stretch the dough to the edges of the baking sheet by placing your hands underneath and pulling outward. The dough will continue to shrink a bit, so repeat the stretching once or twice over the course of 30 minutes to ensure the dough remains stretched.
- At the end of the 30 minutes, "dimple" the dough by pressing the pads of your first three fingers in at an angle (don't push all the way through the dough).
- Make the brine by stirring together the salt and water until salt is dissolved, then pour it over the dough to fill the dimples. It will seem too wet but just go with it!
- Set the focaccia aside to rise for 45 minutes until the dough is light and bubbly.
- With 15 minutes left in that final rise, adjust your main oven rack to center position, and a second rack to the upper position. Preheat oven to 450°F. If you have a baking stone, put it on the center rack, and otherwise invert another sturdy baking sheet and place it on that rack. Allow it to preheat with the oven until it's very hot, before proceeding with baking.
- Sprinkle the dough with flaky salt and bake for 25 to 30 minutes directly on top of the stone or inverted baking sheet, until the bottom crust is crisp and golden brown when checked with a metal spatula. To finish browning the top crust, move the focaccia to the upper rack and bake for 5 to 7 minutes more.
- Remove from the oven and brush or douse with 2 to 3 more tablespoons of oil over the whole surface (don’t worry if the olive pools in pockets, it will absorb as it sits). Let cool for 5 minutes, then release the focaccia from the pan with a metal spatula and transfer to a cooling rack. Let it cool for at least 30 minutes!
- Serve warm or at room temperature.
Notes
- This is the time to use GOOD olive oil, as this is such a simple recipe it does really impart a lot of flavor.
- Storing leftover bread is always tough, especially for something crusty/crunchy like focaccia...to store, wrap in parchment and then keep in an airtight bag or container to preserve the texture. Then you can lightly toast or reheat any leftover focaccia before serving.


In the Netflix 4 part series the recipe they use there is malt that is added. He shows it as one of the ingredients. It is not listed in her recipe on the website. My dimples never hold up like on the video. It seems to be more elastic and the finger prints just kinda go away. It looks nothing like the dough when he puts the finger prints in it. I follow the recipe by the letter. Any suggestions?
Hi Albert! Sorry for the delayed response, I had to go down a rabbit hole to try and get some answers First on the malt, I went back and re-watched and you’re totally right…it’s shown and talked about there but not in any other place I could find (including her recipe; to be fair, she was making someone else’s recipe on the show). For one thing I’m guessing that’s because it’s maybe harder to find in most places? I did find this info though, which might explain its purpose: “Diastatic malt powder is the secret ingredient bread bakers use to promote a strong rise, great texture, and obtain the coveted typical brown crust. This ingredient is especially useful when flour is not added with barley malt, like most whole-wheat flour and many organic flours.” Interesting and possibly worth a try, but I can vouch that it’s amazing without it. Now, for the finger dimples…that is strange for sure, the dough after all the rising should keep the dimples though as you can see from my photos that mine aren’t quite as glorious as in the show either. Is it for sure re-risen enough? Is the dough possibly too thin on your baking sheet? My gut reaction is that the gluten somehow hasn’t developed enough and then proved enough to hold its shape. Are you making the dimples with wet fingers (or maybe olive oil fingers)? I wish I had more concrete answers!
You can buy malted barley syrup at beer brewing supplies and even on Amazon. It’s a very thick molasses looking and brown. We use it in bread and it’s amazing in pretzels too.
Ooh thanks for the tip!
The ingredient measurements are also different on the BA video – 800 grams of flour is much more than 5 1/3 cups and one, not 1/2 teaspoon active dry yeast. I like weighing when baking bread, so watched the video to record measurements, but started making the recipe and saw the difference. I’ll make the written recipe instead. Just fyi.
Good to know! I’m on a sad gluten-free spree for a bit, but next time I’m able to make this I’ll compare the two and see if I can figure out why it’s different. Wonder if she’s making 2 pans?