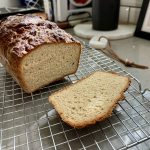
The Best Soft Gluten-Free Sandwich Bread Ever
This gluten-free sandwich bread is the best I've ever made...it's incredibly soft and squishy, and sturdy enough to make sandwiches. It's super easy to make, stays soft for days, and will finally let GF people have normal, delicious sandwiches and toast!
Equipment
Ingredients
- 20 g whole psyllium husk (see recipe notes for psyllium husk powder)
- 280 g lukewarm water
- 230 g tapioca starch (see recipe notes on substitutions)
- 135 g millet flour, plus extra for flouring the surface
- 60 g sorghum flour (see recipe notes for substitutions)
- 50 g granulated sugar
- 8 g instant yeast (yes, instant or rapid rise)
- 8 g baking powder
- 7 g xanthan gum
- 12 g salt
- 120 g whole milk lukewarm
- 2 large eggs room temperature
- 25 g avocado oil olive oil is fine too
- 1 egg white whisked, for brushing the bread before baking
Instructions
Make the dough:
- I STRONGLY recommend weighing ingredients vs. measuring. And I recommend the dough using a stand mixer fitted with the dough hook attachment, as it'll be very soft and sticky.
- Mix the dry ingredients: In the bowl of a stand mixer with dough hook attachment, whisk together the tapioca starch, millet flour, sorghum flour, sugar, instant yeast, baking powder, and xanthan gum. I do NOT put the salt in quite yet, as it can retard the yeast.
- Make the psyllium gel: In a medium bowl, whisk together the psyllium husk and lukewarm water. After about 30-45 seconds, a gel will form.
- Add the milk, eggs and oil to the psyllium gel, and whisk well to combine.
- Make the dough: Make a well in the middle of the dry ingredients and add the psyllium gel-egg mixture, THEN add the salt.
- Mix the dough until smooth and all the ingredients are evenly incorporated, scraping down the bowl as needed to incorporate all the dry ingredients.
- Then knead for a further 4-5 minutes in the stand mixer (I do it on medium-low to medium, around a 4-5 speed). Use a rubber spatula to occasionally scrape along the sides make sure everything gets in there. This extra kneading time will make the dough EXTRA smooth, which is the key to beautiful gluten free sandwich bread.
- The final dough will be VERY soft and sticky---this is on purpose! Resist the temptation to add more flour to the dough. You'll be working on a generously floured surface with floured hands. If you have time and are worried about dealing with it, you can chill it in the fridge for about 1 hour before proceeding to the next step. This will make the dough slightly less sticky and therefore easier to handle. However, I've tried it both ways and don't see a reason to chill it.
Shaping and rise:
- It's very important to work on a quite generously floured surface and with floured hands.
- Turn out the dough onto a generously floured surface, and dust the top of the dough with flour as well. With floured hands, shape it into a smooth ball/oval as best you can. Yes, it's sticky.
- Use the palms of your hands to gently press the dough into a log shape that fits snugly into the loaf pan.
- Carefully transfer it into a 9x5-inch (23x13cm) loaf pan. You don’t need to grease or butter the pan.
- Use a bread lame or a sharp knife to score the bread with 3 diagonal slashes. It's easier to do this now vs when it's risen, and you'll get a smoother top crust.
- Lightly cover the loaf pan with a sheet of plastic wrap (I actually use a shower cap) to prevent the bread from drying out and let it rise in a warm (non-drafty) spot until doubled in size, about 1 hour 15 minutes to 1 hour 30 minutes.
Bake your sandwich bread:
- After your bread has been proofing for about 45 minutes, preheat your oven to 400ºF (200ºC). Place a baking steel, baking stone, or heavy-duty baking sheet on the bottom (lowest) oven rack.
- Once the dough has doubled in size, brush it gently with the whisked egg white.
- Place the loaf pan directly onto the preheated baking stone and bake at 400ºF for between 50 minutes and up to 1 hour 10 minutes, or until the bread is deep golden brown on top, the bottom and side crust is crisp, and the bread weighs about 960-970g without the pan (meaning it’s lost enough moisture during baking). If the top of your loaf starts browning too much, you can cover it with foil (shiny side up) and continue baking until done. I've found mine is definitely done before 55 minutes so start checking early!
- Immediately out of the oven, transfer the sandwich bread onto a wire rack to cool (don't leave it in the loaf pan). I like to give it a little spritz with olive oil (or even water) to slightly soften the crust. Cool it completely to room temperature (or at least until lukewarm) before you slice into it.
Storage:
- You have a few options for storing, depending on what works best. I left my loaf on the counter for a couple days and lightly covered the cut end with foil, slicing what I needed.
- This bread keeps very well in a closed container in a cool, dry place (or at room temperature) for 3-4 days. It'll stay soft for days.
- I don't eat tons of bread on my own, so I slice it and put it in a freezer-safe ziploc with parchment paper and then just pull out a slice or two as needed, refreshing it in the air fryer. It keeps in the freezer for a few months.
Notes
- I STRONGLY recommend using a digital scale to weigh your ingredients rather than measuring, but if you absolutely can't, I've provided the cup/teaspoon measurements in the blog post just above the pin image.
- Pro tip, weigh your loaf pan when it's empty so you can weigh the loaf when it comes out--and make sure enough moisture has evaporated.
- The recipe calls for whole psyllium husk, but if you're using psyllium husk powder, use only 17g.
- You can sub equal weights of cornstarch, potato starch, or arrowroot starch for the tapioca starch.
- You can sub equal weight of light buckwheat flour or oat flour instead of the sorghum flour.