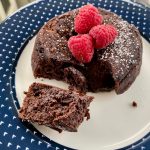
The Best Easy Chocolate Molten Lava Cakes (Naturally GF)
These amazing molten lava cakes are the easiest chocolate lava cakes around...they only take a few minutes to make and are naturally gluten-free.
Servings: 2 personal lava cakes
Ingredients
- 4 tablespoons 55 grams of unsalted butter, cut into chunks, plus more for dishes
- 2 teaspoons of cocoa powder plus more for dusting (I prefer Hershey's Special Dark)
- 3 ounces 85 grams of bittersweet chocolate, roughly chopped (see notes)
- 1/8 teaspoon of fine sea salt or a couple pinches of flaky salt
- 1 to 2 tablespoons 13 to 25 grams of granulated sugar (see notes)
- 1 large whole egg + 1 large egg yolk ideally room temp
- Optional: fillings or flavorings e.g. citrus zest
Instructions
- Heat oven to 450 F.
- Brush two 6-ounce ramekins or baking cups with melted butter, making sure not to miss any spots. Spoon a little cocoa powder in each and pat it around so it coats the bottom and sides, then knock the excess out. I tried cutting corners here and had them stick every time, so don't skip this (and yes, butter seems to be much better than cooking spray).
- In a medium heatproof bowl, put 4 tablespoons of butter and the chocolate pieces and melt them about two-thirds of the way. There are two ways you can do this, either in the microwave or set over a pot of simmering water---I do the microwave, about 15-20 seconds at a time and stirring in-between. You don't want it all the way melted because it will be too hot to add the egg.
- Whisk until it finishes melting and then whisk in the sugar and salt. Whisk in the egg and beat it until mixed in, and THEN add a good 20 to 30 extra times. This ensures that the mixture is smooth, glossy, and lightened a bit. DO NOT SKIP THIS. It makes a huge difference in your final cake texture. See pics above for what it looks like.
- Finally, add the cocoa powder and whisk until combined.
- Divide between the two ramekins. If you're adding a filling, see notes below on how to do this.
- Bake 7 to 9 minutes (7 will be the most molten in the center, 9 still plenty gooey; mine always need 8 or 9 minutes). Transfer to a cooling rack for 1 minute. I take my mini offset spatula or a butter knife and very lightly go around the edge of the cake, just to loosen it more cleanly.
- Then (wearing pot holders), place a small dessert plate over your first ramekin. Flip it onto the plate, count to ten, then lift the cup off. Repeat with second cake. Dust with powdered sugar and serve as-is or with berries, barely sweetened whipped cream, or a little ice cream. Eat immediately.
Notes
- Use a *quality* chocolate for this, as it comprises a huge amount of the flavor and texture. Guittard, Ghiradelli, and others are good.
- The sugar can be flexible here depending on your taste and the type of chocolate you're using. My preference is using a solidly bittersweet chocolate (70 to 72%), and in that case I use 1 tablespoon of sugar, maybe a tiny bit more because I like it less sweet. With a more semisweet chocolate (~60%), you could use even less.
- If you’re using salted butter, you can skip the additional salt, or just add a pinch of flakes for crunch.
- You can put a spoonful of almost anything inside that you wish to merge with the molten center, and I almost always do this. All you have to do is spoon half the batter into the ramekin, add a centered dollop of your filling, and spoon the remaining batter on top. Peanut butter is my favorite, and I've done tart cherry jam, my peanut butter balsamic caramel (YUM), and you can get creative.
- You can also flavor the batter with citrus zest, espresso powder, extracts, or anything else that strikes your fancy (but doesn't change the batter consistency).
- You can make the batter and fill the prepared cups, then refrigerate until you want to bake them. They go into the oven directly from the fridge, but will need to bake 1 to 2 minutes longer. This works fine though after extensive testing I'd still say making it fresh has a *marginally* better texture.