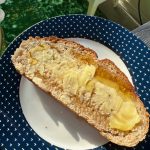
Delicious & Easy Air Fryer Bread
Did you know you can make bread in the air fryer?? Whether you don't want to turn your oven on or it's broken, air fryer bread is super easy to make, and requires no special techniques or real hands-on time. It's easy and delicious!
Servings: 1 medium loaf
Ingredients
- 1 cup of water lukewarm
- 2 1/2 cups or more of bread flour see notes on flour types
- Scant tablespoon or 1 packet of instant yeast
- 1 tablespoon of sugar
- 2 teaspoons of kosher salt
Instructions
- Pour the water into a large mixing bowl. Add the yeast and sugar and give it a quick stir. Leave for 5 minutes to make sure the yeast starts to get a tiny bit foamy (just showing it's not dead).
- Add in the flour and salt and stir until a shaggy, sticky dough is formed (see pic above). Ideally you want it to not be somewhat wet, or at least not too dry.
- You don't have to knead this dough, but can do a few "stretch and folds”. Grab it at the edge, stretch up, and fold it into the middle. Turn the bowl a quarter-turn and do the same thing a few times. Then cover with plastic wrap (or a clean towel, but I prefer a tight seal over the bowl) and place somewhere warm to rise for an hour (ideally a bit longer if you have the time). You want it to double and get jiggly and bubbly.
- Once it's risen, tip the dough onto a lightly-floured counter. Gently stretch into a rectangle and fold in thirds like a letter, then roll up the ends and use you hands to gently shape it into a ball or oval shape. Add a bit more flour if needed but try not to add too much.
- Place it on a small piece of parchment paper. Cover loosely and leave to rise for a half hour.
- Preheat your air fryer to 400°F (200°C, usually the highest it goes) for five minutes. Score the top of the bread with a knife or lame.
- Gently transfer the parchment paper to the air fryer and cook for around 10 minutes at 400°F. Then lower the heat to 350°F (180°C) and continue to cook for 20-25 minutes. The length will very much depend on the size of loaf as well. If you have one bigger loaf it'll be longer, but I've also done this as three tiny loaves so those don't need as long.
- If possible, for the last 5 minutes, turn the loaf over so that the bottom is facing up toward the heating element for the last 5 minutes. Check the temperature inside the loaf to make sure it's done, it should be around 210 F and sound hollow when tapped on the bottom.
- Remove from the air fryer and place on a rack to cool. Wait to slice until the temperature has reached around 80 F inside.
Notes
- As I mention at the top of the post, you can make this with different flours, but I've found bread flour to produce the most consistent and best-textured loaves. I have not tested this with any gluten-free flours, but always make this with my favorite Sunrise Mills organic heritage ones (which GF people can often tolerate).
- The loaves may seem a bit scorched and hard on top, but this is normal (due to the heating element being above) and they'll soften and taste great.
- The best way to store bread is to slice it and freeze it. You can then toast slices from frozen as and when you need them. The bread can also be placed in a bread bag or wrapped in a linen towel for up to three days.